Description
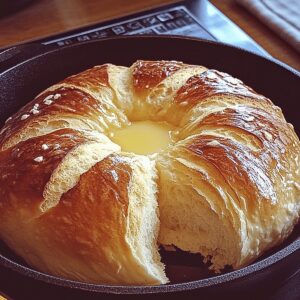
Easy homemade No-Oven Stovetop Bread brings Mediterranean comfort to kitchen counters with minimal equipment. Rustic, warm slices invite you to savor simple pleasures of traditional cooking methods.
Ingredients
Scale
- 2 ½ cups (591 ml) all-purpose flour
- ¾ cup (177 ml) warm water
- 2 tbsps (30 ml) vegetable oil or melted butter
- 2 teaspoons (10 ml) instant yeast (or active dry yeast)
- 1 teaspoon (5 ml) salt
- 2 teaspoons (10 ml) sugar
Instructions
- Yeast Activation: Dissolve yeast in warm, sweetened liquid, letting it bloom into a frothy mixture, signaling optimal fermentation readiness.
- Dough Formation: Merge flour and salt in a large bowl, creating a foundation for the artisan loaf. Pour in activated yeast, oil, and warm liquid, mixing until a unified dough develops.
- Kneading Process: Transfer dough to a floured surface, massaging and stretching with rhythmic motions. Work the mixture persistently, developing elastic gluten strands until the texture becomes smooth and resilient.
- First Proofing: Place dough in an oiled container, cover with a damp cloth. Rest in a warm environment, allowing the dough to expand and mature, nearly doubling its original volume.
- Shaping and Preparation: Deflate the risen dough, redistributing internal gases. Shape into a compact, symmetrical form sized perfectly for the cooking vessel. Simultaneously, warm a nonstick skillet or heavy-bottomed pot over low heat.
- Initial Cooking Stage: Gently position the shaped dough in the prepared skillet, covering with a tight-fitting lid to trap moisture. Cook patiently, allowing the exterior to transform into a golden, crisp landscape over 12-15 minutes.
- Final Cooking and Browning: Carefully flip the bread to ensure uniform caramelization, cooking the alternate side for an additional 10-12 minutes while monitoring color and internal doneness.
- Cooling and Serving: Remove bread from the cooking surface, transferring to a wire rack. Allow natural cooling to stabilize the internal structure before slicing and presenting the artisan creation.
Notes
- Activate Yeast Precisely: Ensure water temperature is between 100-110°F to wake up yeast without killing it, creating a frothy, alive mixture that guarantees perfect bread rising.
- Control Moisture Carefully: Adjust liquid quantities based on flour absorption; humid days might require less liquid, while dry environments need slightly more to maintain ideal dough consistency.
- Monitor Heat Strategically: Use the lowest possible flame setting to prevent burning, creating even golden-brown crust without scorching the bread’s exterior or leaving raw interior sections.
- Rest Dough Completely: Allow bread to cool for at least 15-20 minutes after cooking, enabling internal steam to redistribute and preventing gummy texture when slicing.
- Prep Time: 15 minutes
- Cook Time: 25 minutes
- Category: Breakfast, Snacks
- Method: Frying
- Cuisine: American
Nutrition
- Serving Size: 5
- Calories: 190
- Sugar: 1 g
- Sodium: 200 mg
- Fat: 6 g
- Saturated Fat: 1 g
- Unsaturated Fat: 5 g
- Trans Fat: 0 g
- Carbohydrates: 32 g
- Fiber: 1 g
- Protein: 4 g
- Cholesterol: 0 mg