
Valentine’s Day Oreo Pops Recipe: Charming Love-Day Sweets
Sweet treats have a special way of capturing hearts, and these Valentine’s Day Oreo pops effortlessly blend chocolate decadence with romantic charm.
Creamy vanilla-dipped Oreo pops create a delightful dessert that melts hearts faster than chocolate.
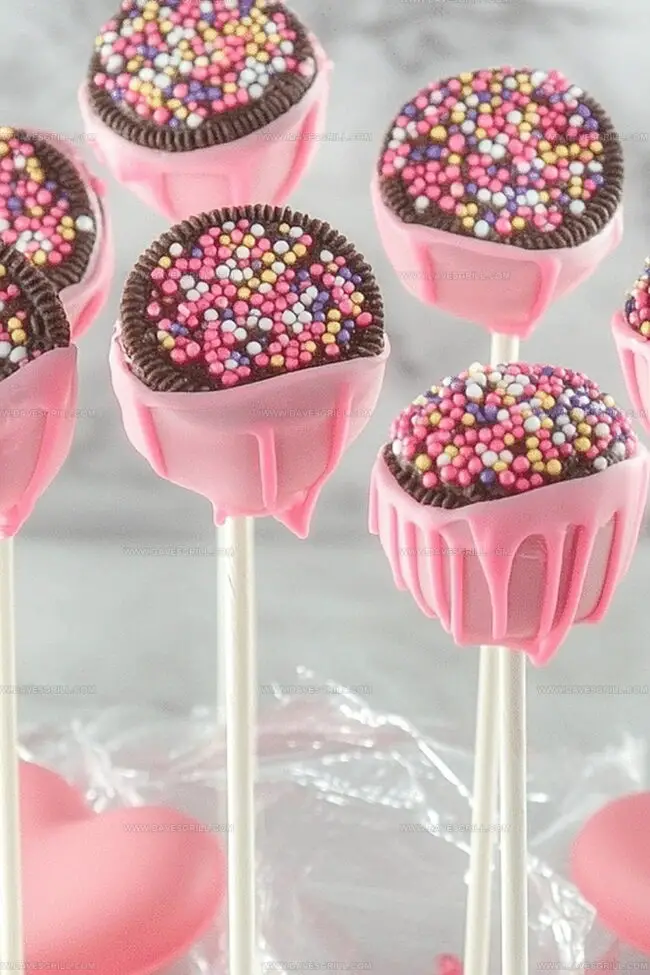
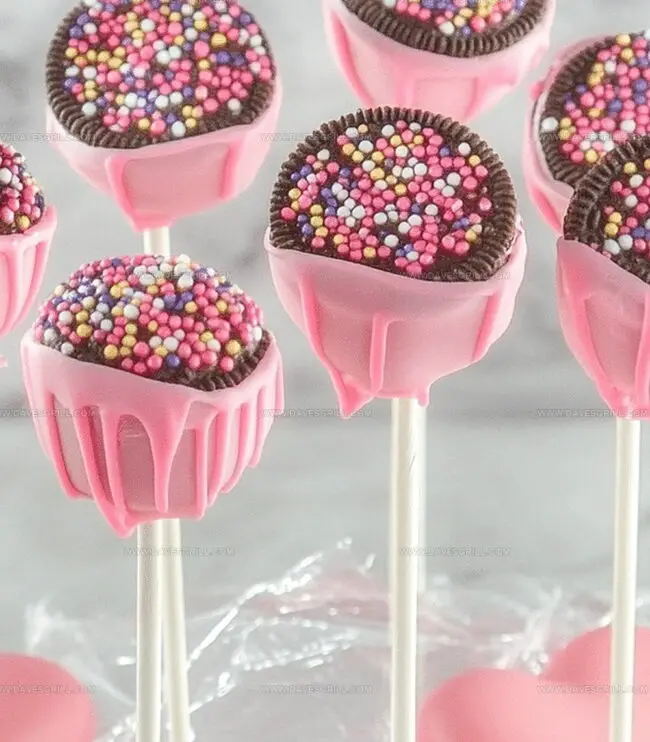
Each pop becomes a canvas for love, decorated with sprinkles and delicate chocolate drizzles.
The simple yet elegant design makes these treats perfect for sharing with someone special.
Crafted with just a few ingredients, these pops transform ordinary cookies into extraordinary expressions of affection.
Chocolate lovers and romance enthusiasts will adore these charming bite-sized delights.
Surprise your sweetheart with these adorable, love-infused treats that promise to spark joy and create memorable moments.
Quick Recipe Overview
Ingredients You Need for Valentine Oreo Pops
For The Base:For Coating And Melting:For Decorative Touches:Tools That Make Oreo Pops Party-Ready
How to Assemble Valentine’s Oreo Pops With Care
Carefully separate Oreo cookies and insert lollipop sticks right into the cream center. Press cookie halves back together, ensuring stick stays secure.
Melt white chocolate or candy melts in microwave, stirring every 20 seconds until silky smooth. Use separate bowls for different colors if desired.
Dunk each Oreo pop into melted chocolate, fully submerging the cookie. Gently shake off excess chocolate and place on parchment-lined tray.
While chocolate remains wet, sprinkle Valentine-themed decorations like sparkly sugar or cute heart-shaped sprinkles. Optional: Drizzle contrasting chocolate for elegant design.
Allow pops to harden at room temperature for half an hour or speed up process by chilling in refrigerator for 15 minutes.
Display pops in charming glass containers, wrap individually in clear treat bags with ribbons, or arrange beautifully on serving platter for guests.
Decorate Oreo Pops With a Festive Look
Serve Oreo Pops for Valentine’s Fun
Keep Oreo Pops Fresh Before Serving
Print
Adorable Valentines Day Oreo Pops Recipe
- Total Time: 35 minutes
- Yield: 13 1x
Description
Sweet Valentine’s Day Oreo Pops create a playful dessert that delights couples and friends. Chocolate-dipped cookies on sticks showcase romantic creativity with minimal effort and maximum charm.
Ingredients
- 12 Oreo cookies (classic or flavored)
- 12 lollipop sticks or paper straws
- 8 oz (225 g) white chocolate or candy melts (red, pink, or white)
- ¼ cup (50 g) semi-sweet or milk chocolate (optional for drizzling)
- Valentines Day-themed sprinkles, nonpareils, or edible glitter
Instructions
- Preparation: Separate Oreo cookies and insert lollipop sticks into the creamy center, reuniting cookie halves. Use melted chocolate as adhesive if cookies crumble.
- Chocolate Melting: Liquify white chocolate or candy melts using microwave, employing 20-second intervals and stirring between each burst. Ensure smooth, glossy texture for multiple color options.
- Coating Process: Submerge each Oreo pop fully in molten chocolate, rotating to achieve complete coverage. Tap stick’s edge to remove excess chocolate, allowing smooth dripping back into container.
- Decoration Technique: While chocolate remains glossy, embellish pops with Valentine’s Day sprinkles, edible glitter, or intricate chocolate drizzles using semi-sweet or milk chocolate. Apply designs precisely with spoon or piping tool.
- Setting and Cooling: Allow decorated pops to solidify at room temperature for 30 minutes or expedite cooling in refrigerator for 15 minutes until chocolate hardens completely.
- Presentation: Display finished treats in decorative glass container, wrap individually in transparent gift bags with romantic ribbons, or arrange attractively on serving platter for immediate serving and enjoyment.
Notes
- Select Cookie Integrity: Choose fresh, intact Oreos without cracks to prevent breakage during stick insertion, ensuring a sturdy base for your Valentine’s treat.
- Chocolate Melting Mastery: Use low heat and constant stirring to prevent chocolate from burning, creating a smooth, glossy coating that evenly embraces each Oreo pop.
- Decorative Precision: Apply sprinkles or drizzles immediately after dipping while chocolate remains wet, allowing embellishments to adhere perfectly and create a professional finish.
- Storage Strategy: Store completed Oreo pops in a cool, dry environment, avoiding direct sunlight to maintain chocolate’s sheen and prevent potential melting or decorative breakdown.
- Prep Time: 20 minutes
- Cook Time: 15 minutes
- Category: Desserts, Snacks
- Method: Blending
- Cuisine: American
Nutrition
- Serving Size: 13
- Calories: 150
- Sugar: 12 g
- Sodium: 50 mg
- Fat: 8 g
- Saturated Fat: 4.5 g
- Unsaturated Fat: 3 g
- Trans Fat: 0 g
- Carbohydrates: 20 g
- Fiber: 1 g
- Protein: 1 g
- Cholesterol: 5 mg
Emily Lawson
Content Creator & Culinary Specialist
Expertise
Education
Oregon Culinary Institute
Diploma in Culinary Arts
Focus: Emphasis on farm-to-table cooking, sustainable practices, and the fusion of global flavors with traditional grilling methods.
Emily Lawson is the content creator at Daves Grill, turning tasty ideas into clear, easy recipes. Based in Portland, she trained at the Oregon Culinary Institute and loves cooking with fresh, seasonal ingredients, especially grilled veggies and global flavors.
Emily mixes food writing with hands-on cooking to bring you recipes that feel fun, not stressful. Her goal is to make every dish simple, flavorful, and worth coming back to. Together, she and Dave serve up real food, one recipe at a time.