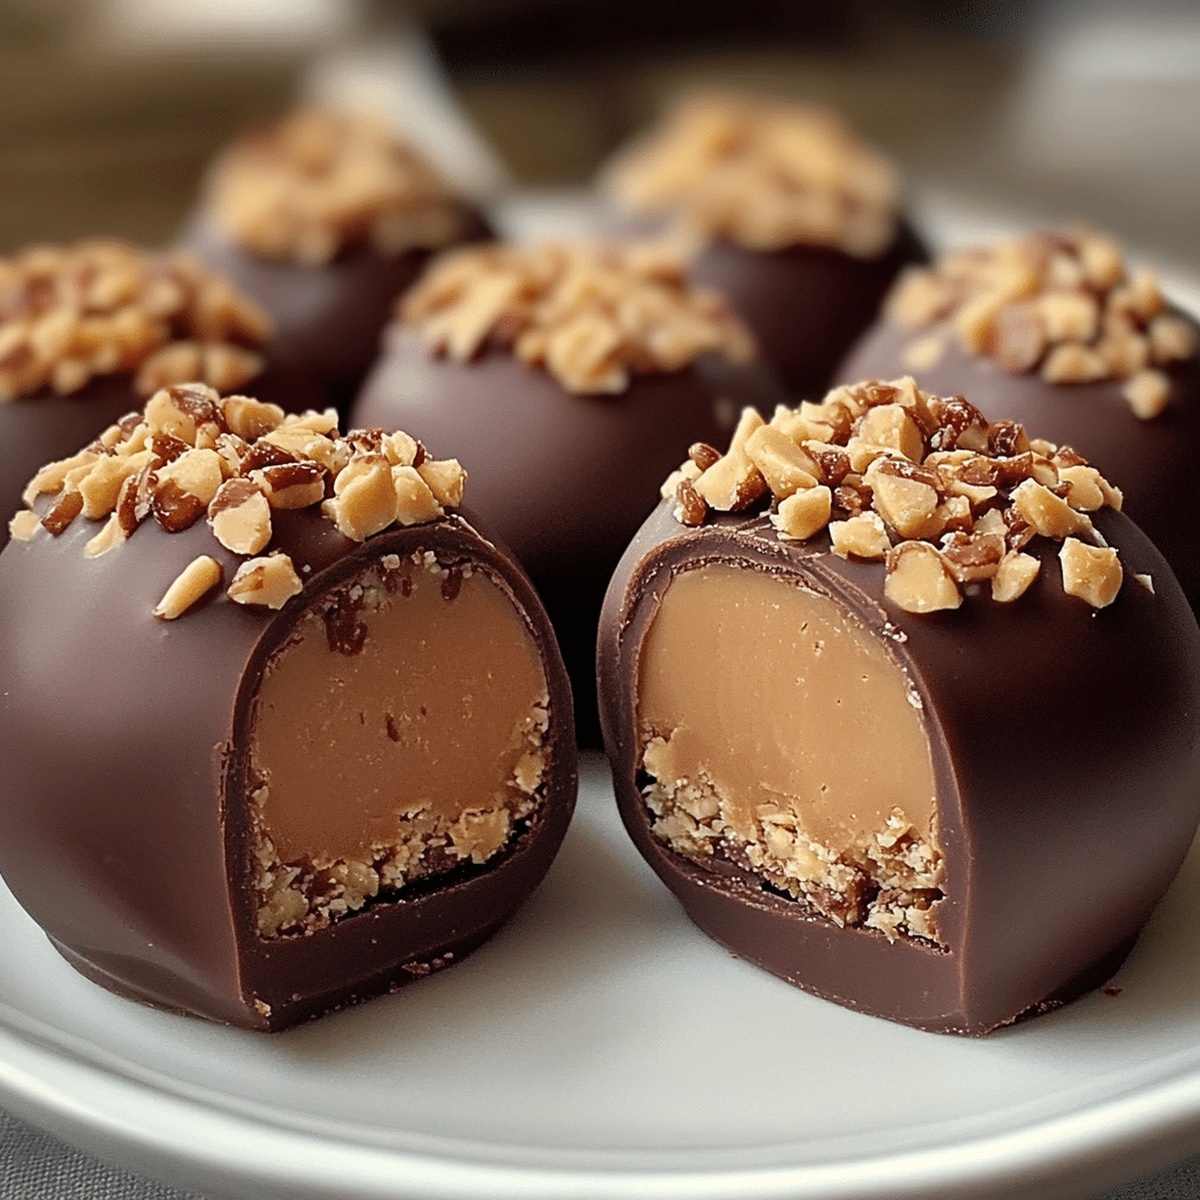
Irresistible Butterfinger Peanut Butter Bombs Recipe for Sweet Cravings
Sweet memories of childhood snacks dance through my mind when I think about these butterfinger peanut butter bombs that promise pure nostalgic bliss.
Crunchy candy bits nestled inside creamy peanut butter create an irresistible combination that sparks joy.
Chocolate lovers will swoon over the rich coating melting against unexpected texture.
Each bite delivers a playful crunch that breaks through smooth layers of decadence.
Crafting these treats becomes a delightful adventure in your kitchen, transforming simple ingredients into something magical.
No complicated techniques stand between you and dessert perfection.
Quick preparation means minimal effort yields maximum deliciousness.
Grab a plate and let the indulgence begin!
Fan Favorites About Peanut Butter Bombs
Shopping List for Peanut Butter Bombs
Main Ingredients:
Peanut Butter Mixture:- Peanut Butter, Butter, Vanilla Extract: Creamy base that provides rich, smooth flavor and helps bind the ingredients together. Natural peanut butter works best for authentic taste.
Sweet Binding:- Powdered Sugar: Adds sweetness and helps create a firm, moldable texture for the bombs.
Flavor Crunch:- Butterfinger Candy Bars: Provides signature crunch and distinctive butterscotch-peanut butter flavor. Crush bars into small, consistent pieces for even distribution.
Coating:- Chocolate Melting Wafers: Smooth coating that adds a glossy finish and extra chocolate flavor. Choose high-quality chocolate for best results.
Optional Garnish:- Butterfinger Crumbs: Extra topping for added texture and visual appeal. Sprinkle on top of chocolate-coated bombs for a professional look.
How to Roll Peanut Butter Bombs with Ease
Whip Up Creamy Peanut Butter Base
In a spacious mixing bowl, grab your smooth peanut butter, softened butter, and vanilla extract. Blend these ingredients until they transform into a silky, luxurious mixture with no lumps. Your goal is creating a perfectly smooth canvas for the deliciousness to come.
Craft Decadent Dough
Slowly introduce powdered sugar into the mixture. Stir persistently until the texture shifts from liquid to a moldable dough that holds its shape. The consistency should feel firm yet pliable, like soft play-dough that’s ready for shaping.
Fold In Crunchy Butterfinger Bits
Gently incorporate crushed Butterfinger pieces throughout the dough. Use a folding motion to ensure the candy fragments are evenly distributed, creating pockets of caramelized crunch in every bite. Each piece of dough should have a delightful sprinkling of candy goodness.
Shape Delectable Peanut Butter Bombs
Roll the dough into small, uniform spheres using your palms. Press gently to compact the mixture, ensuring the Butterfinger pieces stay securely embedded. Aim for bite-sized morsels that promise a burst of flavor in every mouthful.
Chill And Set
Transfer the shaped bombs to a parchment-lined tray. Place in the refrigerator and allow them to firm up for about 30 minutes. This cooling period helps the bombs maintain their shape and intensifies the flavor melding.
Prep and Presentation Tips for Bombs
How to Keep Peanut Butter Bombs Fresh
Ideas for Enjoying Peanut Butter Bombs
Fun Flavor Options for Peanut Butter Bombs
Print
Butterfinger Peanut Butter Bombs Recipe
- Total Time: 45 minutes
- Yield: 24 1x
Description
Chocolate-draped Butterfinger Peanut Butter Bombs deliver irresistible sweet-salty indulgence in bite-sized perfection. Creamy peanut butter centers wrapped in chocolate and crushed candy bars promise delightful flavor explosions you cannot resist.
Ingredients
Main Ingredients:
- 1 cup creamy peanut butter
- ½ cup unsalted butter, softened
- 2 cups powdered sugar
- 1 cup crushed Butterfinger candy bars
Flavoring Ingredients:
- 1 teaspoon vanilla extract
Coating Ingredients:
- 2 cups semi-sweet or milk chocolate chips
- 1 tablespoon coconut oil or vegetable shortening (optional, for smoother chocolate coating)
Instructions
- In a spacious mixing vessel, thoroughly blend peanut butter, softened butter, and vanilla extract until achieving a silky, uniform texture.
- Incrementally incorporate powdered sugar into the mixture, gently stirring until the composition transforms into a pliable, cohesive dough.
- Carefully integrate crushed Butterfinger fragments throughout the mixture, ensuring even distribution of the candied nuggets.
- Using clean hands or a small scoop, portion the dough into uniform spherical shapes, rolling between palms to create smooth, consistent orbs.
- Place the formed clusters on a parchment-lined tray, maintaining slight separation between each delectable morsel.
- Transfer the prepared tray to the refrigerator, allowing the bombs to firm and solidify for approximately 30 minutes.
- Optional: For enhanced indulgence, consider drizzling melted chocolate over the chilled spheres or rolling them in additional crushed Butterfinger pieces to amplify texture and flavor complexity.
Notes
- Chill the mixture for 15-20 minutes before shaping to make handling easier and prevent sticking to your hands.
- Use a cookie scoop or tablespoon to create uniform-sized balls for consistent texture and professional presentation.
- For gluten-free variation, ensure you use gluten-free Butterfinger candy or substitute with crushed gluten-free chocolate peanut butter candies.
- Store bombs in an airtight container in the refrigerator for up to 5 days, allowing flavors to meld and maintain optimal texture.
- Prep Time: 15 minutes
- Cook Time: 30 minutes
- Category: Snacks, Desserts
- Method: Blending
- Cuisine: American
Nutrition
- Serving Size: 24
- Calories: 205
- Sugar: 15 g
- Sodium: 50 mg
- Fat: 13 g
- Saturated Fat: 6 g
- Unsaturated Fat: 7 g
- Trans Fat: 0 g
- Carbohydrates: 22 g
- Fiber: 1 g
- Protein: 3 g
- Cholesterol: 10 mg
Dave Mitchell
Founder & Chief Recipe Developer
Expertise
Education
Asheville-Buncombe Technical Community College
Associate of Applied Science in Culinary Arts
Focus: Comprehensive training in culinary techniques, kitchen management, and menu planning, with a special emphasis on grilling and outdoor cooking.
Dave Mitchell is the heart behind Daves Grill, a cook, writer, and lover of all things grilled. He studied Culinary Arts at Asheville-Buncombe Technical Community College and spent years cooking, testing, and sharing recipes that actually work.
Dave started Daves Grill to keep things simple: one great recipe at a time. His food is bold, easy to follow, and made for real people with regular kitchens. From juicy steaks to quick sides, Dave’s recipes bring the heat without the hassle.