
Festive Candy Cane Kiss Cookies Recipe for Holiday Magic
Sweet memories dance through my grandmother’s beloved candy cane kiss cookies that always bring smiles during holiday gatherings.
Festive baking whispers childhood joy with each delicate, peppermint-studded morsel.
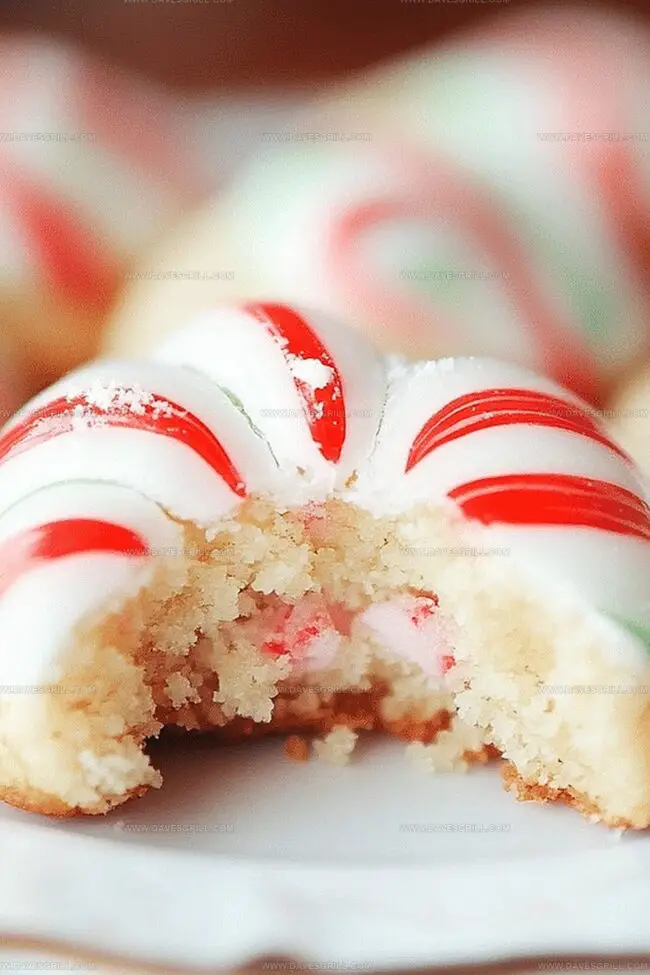
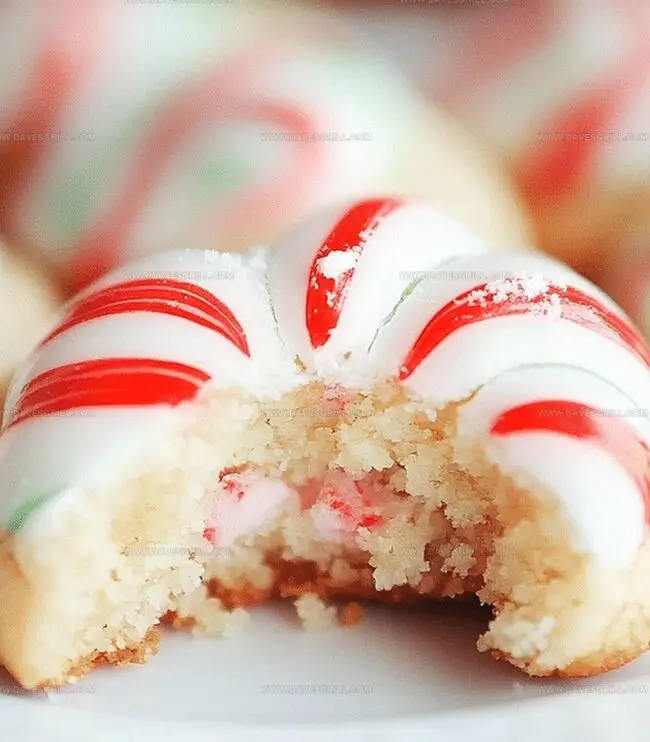
Soft, buttery dough cradles chocolate kisses like precious treasures.
Delicate swirls of red and white peek through tender cookie edges, promising delightful flavor surprises.
Kitchen aromas become magical when these treats emerge from warm ovens, filling spaces with comforting cheer.
Crisp winter afternoons feel cozier with a plate of these delectable morsels beside steaming mugs.
You’ll want to savor every delightful bite and share the happiness these simple cookies bring.
Best Features of Candy Cane Kiss Cookies
Ingredients for Candy Cane Kiss Cookies
Cookie Base:Wet Ingredients:Festive Toppings:Directions for Making Candy Cane Kiss Cookies
Step 1: Warm Up the Oven
Crank the oven to 350F (175C). Cover a baking sheet with parchment paper or silicone mat for hassle-free cleanup.
Step 2: Prepare Dry Mixture
Grab a medium bowl and whisk together:Set the mixture aside.
Step 3: Create Creamy Base
In a large mixing bowl, blend softened butter and granulated sugar using an electric mixer. Whip on medium speed until the mixture looks fluffy and light, around 2-3 minutes.
Step 4: Introduce Liquid Elements
Drop in the egg and vanilla extract. Continue mixing until everything blends smoothly.
Step 5: Marry Wet and Dry Ingredients
Slowly add dry ingredients to wet ingredients. Mix gently until just combined- avoid overmixing.
Step 6: Shape Cookie Balls
Roll dough into small balls, each about 1-inch wide. Arrange on the prepared baking sheet with 2 inches between each cookie.
Step 7: Sprinkle Candy Cane Magic
Crush candy canes in a zip-top bag using a rolling pin. Scatter crushed pieces over each cookie ball, pressing lightly to stick.
Step 8: Bake to Perfection
Slide cookies into the oven for 8-10 minutes. Look for golden edges while keeping centers soft.
Step 9: Add Chocolate Kiss Finale
Pull cookies from oven and immediately press a Hersheys Candy Cane Kiss into the center of each cookie. Let cool on the sheet for 5 minutes, then transfer to a wire rack for complete cooling.
Helpful Notes for Candy Cane Kiss Cookie Success
Storage Advice for Candy Cane Kiss Cookies
Serving Candy Cane Kiss Cookies with Flair
Fresh Twists for Candy Cane Kiss Cookies
Print
Candy Cane Kiss Cookies Recipe
- Total Time: 25 minutes
- Yield: 24 1x
Description
Sweet candy cane kiss cookies blend festive peppermint charm with classic holiday baking magic. Christmas cookie lovers will savor rich chocolate dough complemented by smooth Hershey’s kisses nestled perfectly atop each delicate, tender treat.
Ingredients
Main Ingredients:
- 2 ½ cups all-purpose flour
- 1 cup granulated sugar
- 1 cup (2 sticks) unsalted butter, softened
Wet Ingredients:
- 1 large egg
- 1 teaspoon vanilla extract
- ½ teaspoon peppermint extract (optional, for extra mint flavor)
Additional Ingredients:
- 1 teaspoon baking powder
- ¼ teaspoon salt
- 24 Candy Cane Hershey’s Kisses, unwrapped
- Granulated sugar (extra for rolling)
Instructions
- Prepare the oven environment by heating to 350F (175C) and lining a baking sheet with parchment paper for optimal cookie release.
- Create a dry ingredient foundation by whisking flour, baking powder, and salt in a medium mixing bowl until thoroughly combined.
- Utilize an electric mixer to transform softened butter and granulated sugar into a creamy, aerated mixture with a pale, fluffy texture.
- Introduce egg and vanilla extract to the butter-sugar mixture, blending until the ingredients harmonize into a smooth consistency.
- Gently fold the dry ingredient mixture into the wet ingredients, stirring just until a cohesive dough forms without overworking the batter.
- Craft uniform cookie spheres by rolling the dough into precise 1-inch balls, strategically positioning them on the prepared baking sheet with adequate spacing.
- Transform candy canes into delicate fragments by crushing them within a sealed bag, then delicately sprinkle the crushed pieces atop each dough ball, gently pressing to ensure adherence.
- Bake the cookies for 8-10 minutes, watching for subtle golden edges while maintaining a tender center – precision is key to achieving the perfect texture.
- Immediately after removing from the oven, crown each warm cookie with a Hersheys Candy Cane Kiss, allowing the residual heat to slightly melt the chocolate.
- Allow cookies to rest on the baking sheet for a brief 5-minute cooling period before transferring to a wire rack for complete cooling and setting.
Notes
- Customize the candy cane crushing technique by using a food processor for more uniform pieces, ensuring even distribution of minty crunch across each cookie.
- Chill the dough for 30 minutes before rolling to prevent spreading and maintain a perfect round shape during baking.
- Swap Hershey’s Kisses with dark chocolate or white chocolate versions for varied flavor profiles that complement the peppermint base.
- Store cookies in an airtight container with parchment paper between layers to prevent sticking and maintain their delicate texture for up to 5 days.
- Prep Time: 15 minutes
- Cook Time: 10 minutes
- Category: Desserts, Snacks
- Method: Baking
- Cuisine: American
Nutrition
- Serving Size: 24
- Calories: 150
- Sugar: 10 g
- Sodium: 40 mg
- Fat: 7 g
- Saturated Fat: 4 g
- Unsaturated Fat: 2 g
- Trans Fat: 0 g
- Carbohydrates: 20 g
- Fiber: 0 g
- Protein: 1 g
- Cholesterol: 15 mg
Dave Mitchell
Founder & Chief Recipe Developer
Expertise
Education
Asheville-Buncombe Technical Community College
Associate of Applied Science in Culinary Arts
Focus: Comprehensive training in culinary techniques, kitchen management, and menu planning, with a special emphasis on grilling and outdoor cooking.
Dave Mitchell is the heart behind Daves Grill, a cook, writer, and lover of all things grilled. He studied Culinary Arts at Asheville-Buncombe Technical Community College and spent years cooking, testing, and sharing recipes that actually work.
Dave started Daves Grill to keep things simple: one great recipe at a time. His food is bold, easy to follow, and made for real people with regular kitchens. From juicy steaks to quick sides, Dave’s recipes bring the heat without the hassle.