Spatula: For flipping tater tots midway through baking.
Cutting board: To assemble final mini cheeseburgers.
Sharp knife: For slicing cheese and optional toppings.
How to Bake Mini Cheeseburger Snacks
Warm Up The Oven Crank your oven to a toasty 400 degrees and grab a baking sheet lined with parchment paper for easy cleanup.
Create Crispy Bases Arrange tater tots side by side and gently smoosh them together using a spoon to form little potato platforms that will become your mini burger bases.
Bake To Golden Perfection Spritz the tots with a light cooking spray, then slide the sheet into the oven. Bake for 20-25 minutes, giving them a flip midway to ensure each side gets beautifully golden and crisp.
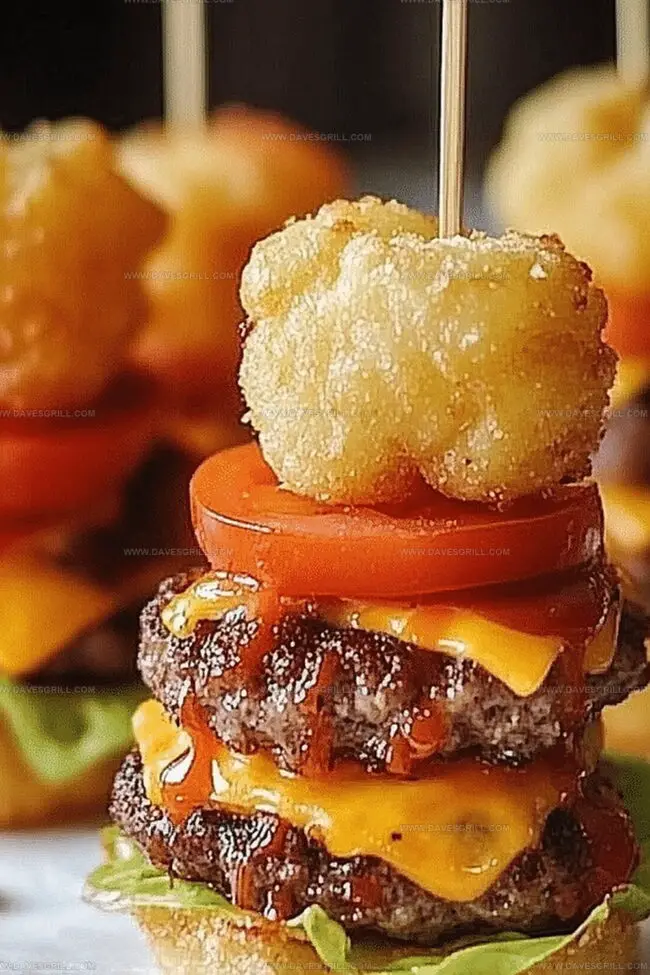
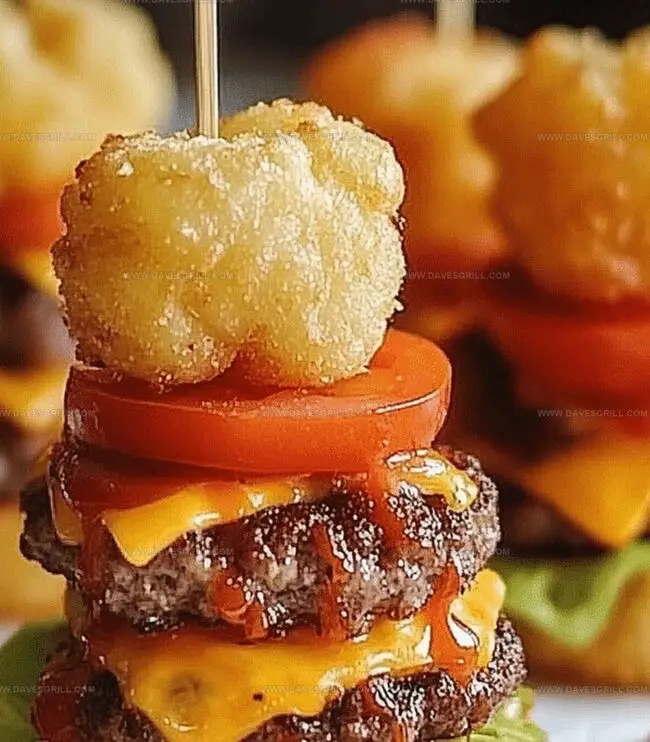
Layer With Meat Patties Place tiny hamburger patties on top of each tater tot base, seasoning with salt and pepper for extra flavor.
Melt The Cheese Sprinkle shredded cheese over the warm meat and let it get all melty and delicious.
Add Fun Toppings Dress up your mini burgers with classic additions like pickle slices, ketchup, or a squirt of mustard.
Serve And Enjoy Plate these adorable mini cheeseburgers while they’re hot and crispy, ready to be devoured in just a couple of bites.
Tips That Add Big Flavor to Small Bites
Ensure tater tots are evenly spaced and not overcrowded on the baking sheet for maximum crispiness and golden-brown edges.
Sprinkle extra shredded cheese on top of the tater tot “buns” during the last 5 minutes of baking for a melty, gooey finish.
Replace tater tots with roasted cauliflower slices or large portobello mushroom caps for a lighter, veggie-based version.
Swap ground beef for plant-based meat alternatives or grilled portobello mushrooms to create a meat-free mini cheeseburger.
Use gluten-free tater tots and check that all additional ingredients are certified gluten-free to accommodate dietary restrictions.
Serve Mini Burgers with Fun Sides
Cheesy Burger Bite Platter: Arrange mini cheeseburgers on a large wooden board with pickles, sliced red onions, and fresh herbs for a stunning presentation that invites guests to grab and enjoy.
Party Appetizer Style: Serve these mini bites on small skewers or toothpicks with a variety of dipping sauces like spicy mayo, classic ketchup, and tangy mustard to create interactive snacking fun.
Game Day Crowd Pleaser: Pair these mini tater tot cheeseburgers with crisp coleslaw, jalapeño poppers, and cold beverages for the ultimate sports watching or casual gathering spread that keeps everyone munching.
Kiddo-Friendly Meal Hack: Cut these into smaller quarters for younger eaters, adding colorful veggie sticks on the side to make mealtime more exciting and nutritionally balanced.
Store Cheeseburgers for Later Appetites
Store leftovers in airtight containers within 2 hours of cooking to maintain freshness and prevent bacterial growth.
These mini cheeseburgers can stay delicious for 3-4 days when refrigerated at 40°F (4°C), ensuring tasty quick meals later.
Wrap individual tots in plastic wrap, then place in freezer bags for up to 1 month, perfect for meal prep and spontaneous snacking.
Warm refrigerated or frozen mini cheeseburgers in a preheated oven at 350°F (175°C) for 10-15 minutes to restore original crispiness and prevent sogginess.
FAQs
Can I use frozen tater tots for this recipe?
Absolutely! Frozen tater tots work perfectly. Just make sure they’re thawed slightly and can be pressed together to form the “bun” shape.
How do I keep the tater tot buns from falling apart?
Press the tots gently but firmly together when forming the base. Using the back of a spoon helps create a compact surface that holds together during baking.
What kind of ground meat works best for the burger patties?
Ground beef with 80/20 lean-to-fat ratio is ideal. It provides enough fat for juicy, flavorful mini burgers that won’t dry out quickly.
Can I make these mini cheeseburgers ahead of time?
Yes! You can prepare the tater tot bases and burger patties in advance. Assemble and bake just before serving to maintain crispiness and freshness.
Crispy mini tater tot cheeseburgers combine classic American comfort food with bite-sized indulgence. Hearty sliders pack robust beef flavor and melted cheese, inviting you to savor each delectable morsel.
Ingredients
Scale
48 tater tots (2 cups)
½ lb (225 g) ground beef
6 slices cheddar cheese
12 mini dill pickle slices
½ tsp salt
¼ tsp black pepper
¼ tsp garlic powder
¼ tsp onion powder
non-stick cooking spray
2 tbsps ketchup (optional)
2 tbsps mustard (optional)
toothpicks for serving
Instructions
Preparation: Preheat oven to 400°F (200°C) and line a baking sheet with parchment paper, creating a non-stick surface for optimal cooking.
Tater Tot Base: Arrange tater tot clusters tightly, gently pressing them together to form compact mini platforms, then lightly mist with cooking spray to enhance browning potential.
Initial Roasting: Bake the tater tot foundations for 22 minutes, rotating midway to ensure consistent golden-brown crispness, then briefly cool to stabilize the base.
Meat and Cheese Layer: Evenly distribute seasoned ground beef across each potato cluster, completely covering the surface, then generously sprinkle shredded cheese to create a melty, cohesive topping.
Final Baking: Return the assembled mini cheeseburgers to the oven for 5-7 minutes, monitoring closely to prevent overcooking while allowing cheese to melt perfectly.
Garnish and Serve: Adorn with diced pickles, minced onions, and a drizzle of preferred condiments like ketchup or mustard, then serve immediately to maintain the ideal crispy texture and melted cheese consistency.
Notes
Optimize Potato Base: Press tater tots gently to create compact, sturdy platforms that support toppings without crumbling.
Control Moisture Level: Use cooking spray sparingly to achieve golden crispness without making potato bases soggy or greasy.
Monitor Cheese Melting: Watch closely during final baking to prevent cheese from burning while ensuring complete, smooth melting.
Customize Dietary Needs: Substitute ground beef with plant-based meat alternatives or turkey for lighter protein options, maintaining similar texture and flavor profile.
Oregon Culinary Institute Diploma in Culinary Arts Focus: Emphasis on farm-to-table cooking, sustainable practices, and the fusion of global flavors with traditional grilling methods.
Emily Lawson is the content creator at Daves Grill, turning tasty ideas into clear, easy recipes. Based in Portland, she trained at the Oregon Culinary Institute and loves cooking with fresh, seasonal ingredients, especially grilled veggies and global flavors.
Emily mixes food writing with hands-on cooking to bring you recipes that feel fun, not stressful. Her goal is to make every dish simple, flavorful, and worth coming back to. Together, she and Dave serve up real food, one recipe at a time.


Emily Lawson
Content Creator & Culinary Specialist
Expertise
Education
Oregon Culinary Institute
Diploma in Culinary Arts
Focus: Emphasis on farm-to-table cooking, sustainable practices, and the fusion of global flavors with traditional grilling methods.
Emily Lawson is the content creator at Daves Grill, turning tasty ideas into clear, easy recipes. Based in Portland, she trained at the Oregon Culinary Institute and loves cooking with fresh, seasonal ingredients, especially grilled veggies and global flavors.
Emily mixes food writing with hands-on cooking to bring you recipes that feel fun, not stressful. Her goal is to make every dish simple, flavorful, and worth coming back to. Together, she and Dave serve up real food, one recipe at a time.