
Enchanting Mint Chocolate Poke Cake Recipe: A Sweet Dream
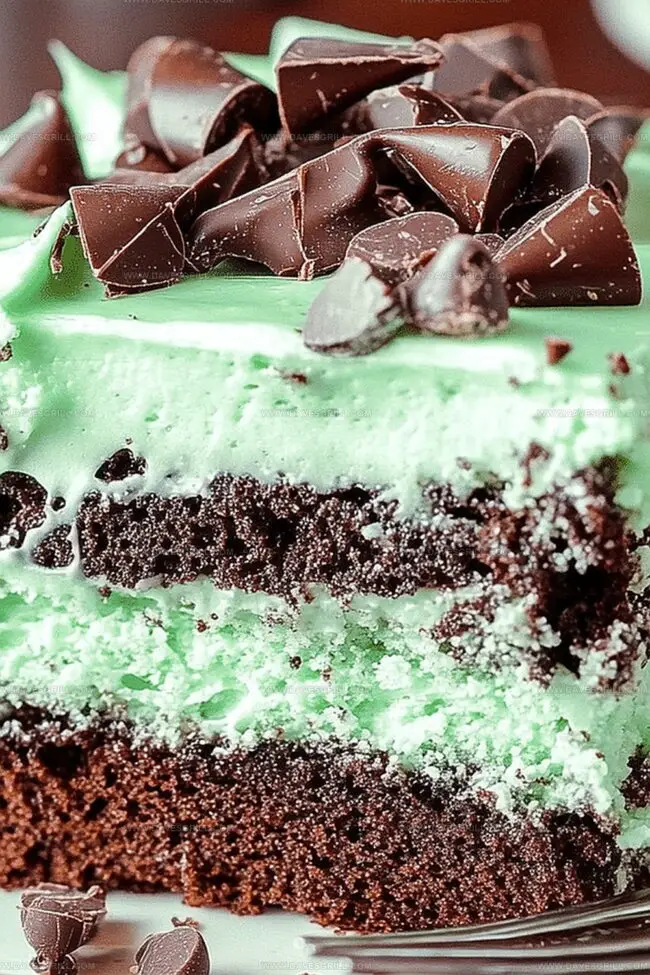
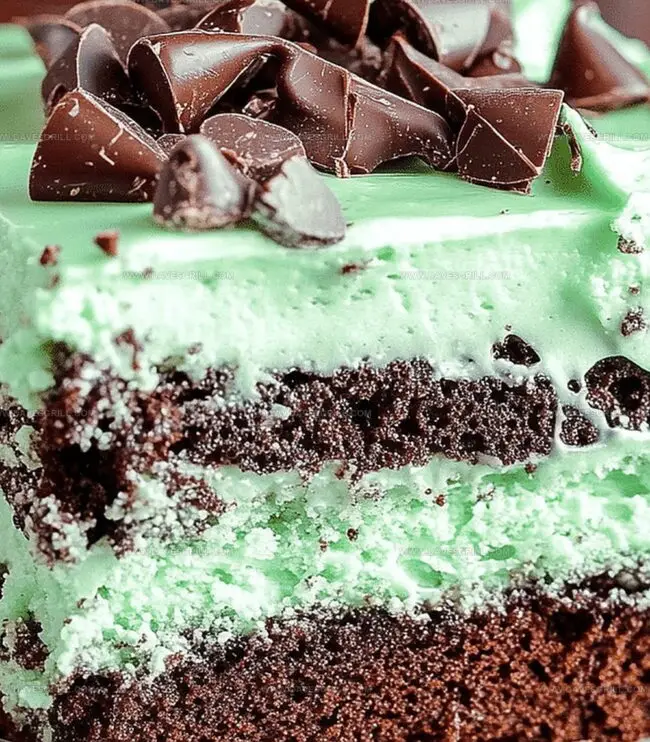
Decadent chocolate cake with a mint chocolate poke recipe blends rich, indulgent flavors that dance across your palate.
Silky smooth chocolate mingles with refreshing mint for an irresistible dessert experience.
Cool and creamy layers promise pure delight in every single bite.
Chocolate lovers will swoon over this simple yet elegant treat.
The contrast between deep chocolate and bright mint creates a harmonious symphony of taste.
Each spoonful delivers a luxurious escape from ordinary desserts.
This cake transforms an afternoon treat into a memorable culinary adventure that will have everyone asking for seconds.
Quick Recipe Overview
Ingredients for Mint Chocolate Poke Cake
For Cake Base:For Moisture and Flavor:For Topping and Filling:Tools for Creating Those Flavor-Filled Holes
Bake and Layer Mint Chocolate Goodness
Bake your favorite chocolate cake according to the box instructions or use a homemade recipe. Allow the cake to cool completely on a wire rack.
Using the handle of a wooden spoon or a chopstick, gently poke evenly spaced holes across the entire surface of the cooled cake. Make sure the holes go almost to the bottom but don’t break through.
Pour prepared mint syrup or pudding mixture slowly over the cake, ensuring it seeps into every hole. The liquid will fill the gaps, creating a deliciously moist texture.
Refrigerate the cake for at least 2 hours, allowing the mint filling to completely absorb into the cake layers and enhance the flavors.
Top the chilled cake with a light mint-flavored whipped cream or frosting. Sprinkle crushed mint chocolate pieces or mint chips over the surface for extra crunch and visual appeal.
Keep the cake in a sealed container in the refrigerator. It will stay fresh and delicious for 3-4 days. Always cover after the cake has completely cooled to prevent condensation.
Tips to Balance Sweetness and Mint
Serve This Cake Chilled for Best Texture
Store in the Fridge Until You Slice Again
FAQs
A poke cake is a dessert where holes are made in a baked cake and then filled with a liquid or sauce to add extra moisture and flavor, creating a deliciously moist and decadent treat.
Yes, you can use milk chocolate, dark chocolate, or semi-sweet chocolate instead of the recommended chocolate, depending on your taste preference.
Use the handle of a wooden spoon or the back of a chopstick to create uniform holes throughout the cake, making sure they are roughly the same size and spread out evenly.
Absolutely! This mint chocolate poke cake can be prepared a day in advance, which actually allows the flavors to meld together and makes the cake even more delicious when served.
Print
Dreamy Mint Chocolate Poke Cake Recipe
- Total Time: 45 minutes
- Yield: 17 1x
Description
Rich chocolate cake infused with mint chocolate pudding highlights classic dessert flavors. Cool whipped topping and chocolate shavings complete this delightful sweet treat that you’ll savor with pure pleasure.
Ingredients
- 1 package (3.4 oz / 96 g) instant chocolate pudding mix
- 2 cups (480 ml) milk
- 1 container (8 oz / 227 g) whipped topping
- 1 box (15.25 oz / 432 g) chocolate cake mix
- ½ cup (90 g) mini chocolate chips or chocolate shavings
- Eggs (as specified on cake mix box)
- Oil (as specified on cake mix box)
- Water (as specified on cake mix box)
- ½ teaspoon mint extract
- 1 tsp mint extract (optional)
- Green food coloring (optional)
- Crushed mint candies or Andes mints (optional)
Instructions
- Cake Preparation: Preheat oven and prepare cake pan with parchment paper, ensuring smooth release after baking.
- Mix Ingredients: Combine dry and wet ingredients thoroughly, whisking until batter achieves a silky, lump-free consistency.
- Baking Process: Transfer batter to prepared pan, smoothing surface evenly; bake until toothpick emerges clean from center.
- Chocolate Infusion: After cooling slightly, puncture cake with wooden spoon handle, creating strategic channels for chocolate sauce absorption.
- Sauce Saturation: Carefully drizzle chocolate sauce into cake’s perforations, allowing liquid to penetrate deeply and enhance internal moisture.
- Cooling Stage: Refrigerate cake for 30 minutes, enabling sauce to solidify and integrate seamlessly with cake’s structure.
- Mint Cream Topping: Whip cream with mint extract until soft peaks form, creating a light, aromatic covering.
- Decorative Finish: Generously spread mint whipped cream across cake surface, then garnish with crushed chocolate mint candies for textural contrast.
- Serving Recommendation: Chill cake thoroughly to marry flavors and set topping, then slice and serve within 3-4 days for peak deliciousness.
Notes
- Ensure Even Mixing: Gently fold dry and wet ingredients to prevent overmixing, which can lead to a dense, tough cake texture.
- Create Precise Holes: Use a wooden spoon handle with consistent diameter to make uniform holes for even chocolate sauce distribution.
- Control Chocolate Sauce Consistency: Warm chocolate sauce slightly to help it penetrate cake holes more effectively without making the cake soggy.
- Stabilize Whipped Cream: Add a touch of powdered sugar or gelatin to mint whipped cream for better structure and longer-lasting peaks.
- Prep Time: 15 minutes
- Cook Time: 30 minutes
- Category: Desserts
- Method: Baking
- Cuisine: American
Nutrition
- Serving Size: 17
- Calories: 150
- Sugar: 15 g
- Sodium: 200 mg
- Fat: 5 g
- Saturated Fat: 2 g
- Unsaturated Fat: 3 g
- Trans Fat: 0 g
- Carbohydrates: 24 g
- Fiber: 1 g
- Protein: 2 g
- Cholesterol: 20 mg
Emily Lawson
Content Creator & Culinary Specialist
Expertise
Education
Oregon Culinary Institute
Diploma in Culinary Arts
Focus: Emphasis on farm-to-table cooking, sustainable practices, and the fusion of global flavors with traditional grilling methods.
Emily Lawson is the content creator at Daves Grill, turning tasty ideas into clear, easy recipes. Based in Portland, she trained at the Oregon Culinary Institute and loves cooking with fresh, seasonal ingredients, especially grilled veggies and global flavors.
Emily mixes food writing with hands-on cooking to bring you recipes that feel fun, not stressful. Her goal is to make every dish simple, flavorful, and worth coming back to. Together, she and Dave serve up real food, one recipe at a time.