Heavenly No Bake Chocolate Eclair Cake Recipe for Sweet Dreams
Creamy layers of pure decadence dance through this no bake chocolate eclair cake, promising a dessert that melts hearts with every single bite.
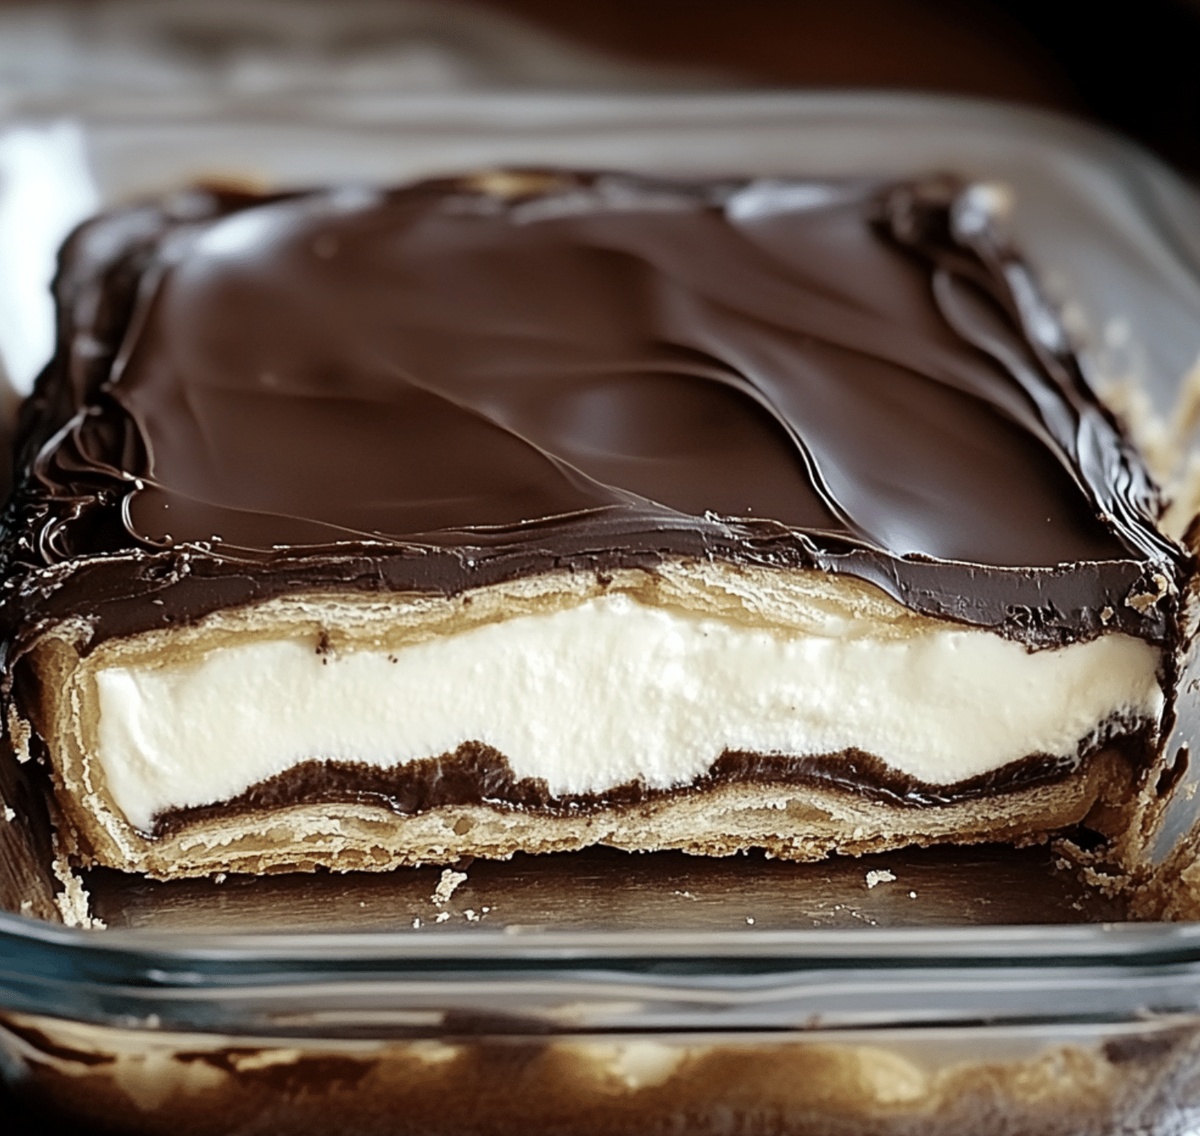
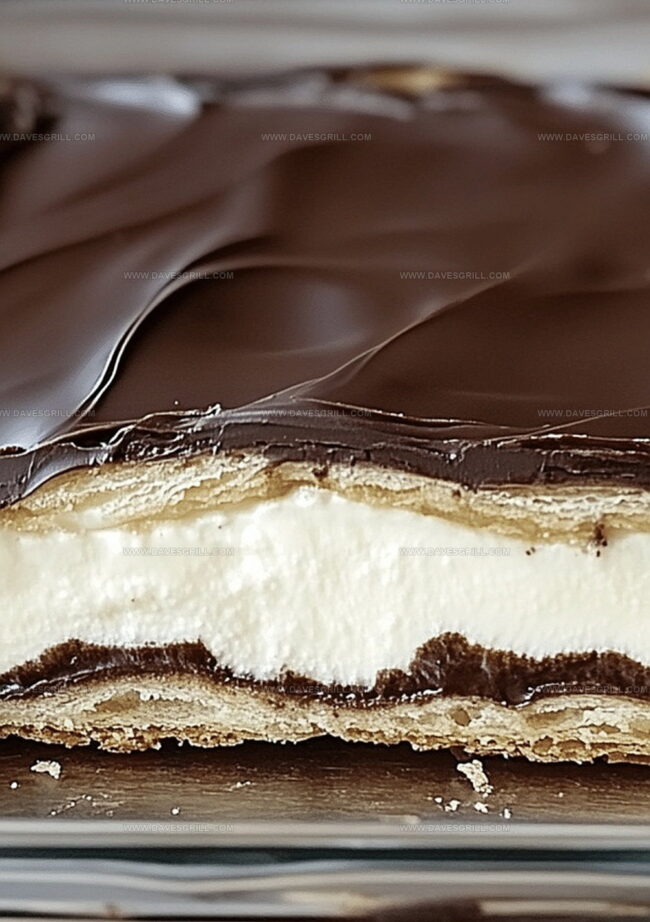
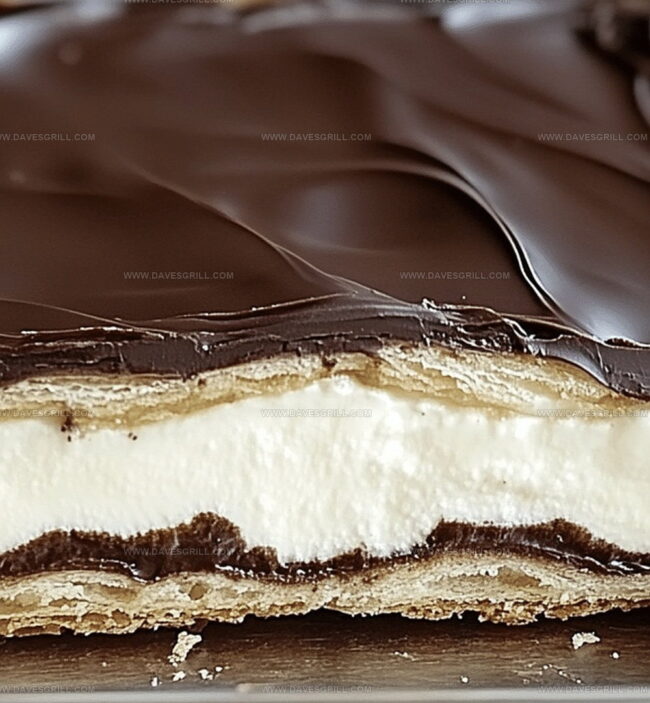
Silky pudding and graham crackers blend into a heavenly texture that whispers sweet promises of indulgence.
Each layer tells a rich story of comfort and culinary magic.
The classic French-inspired treat comes together effortlessly without ever touching an oven.
Chocolate drizzles cascade across the top, creating a mesmerizing finish that calls for immediate celebration.
You won’t believe how simple yet spectacular this dessert can be.
Prepare to fall in love with the most irresistible no-bake sensation that will become your new favorite party showstopper.
Quick Recipe Overview
Chocolate Eclair Cake Ingredient List
For Base Layer:For Filling:For Chocolate Topping:For Optional Enhancement:Ingredient Selection Tips:Kitchen Tools for No-Bake Eclair Cake
Make Eclair Cake That Layers Perfectly
Whisk pudding mix with cold milk until it transforms into a thick, dreamy mixture. Gently fold in whipped topping, creating a silky smooth base for your no-bake delight.
Grab a baking dish and create a foundation of graham crackers, carefully covering the entire bottom. Generously spread half the pudding mixture over the crackers. Add another graham cracker layer, then top with remaining pudding mixture. Finish with a final graham cracker blanket.
Warm heavy cream until it’s just about to simmer. Pour over chopped chocolate and let it sit briefly. Stir until the mixture becomes luxuriously smooth and glossy. Mix in butter for extra richness.
Pour the glossy chocolate mixture over the top layer, spreading it evenly to create a tempting chocolate crown.
Cover the dish and let it rest in the refrigerator for at least 4 hours. This waiting time allows the layers to mingle and soften, creating a heavenly dessert. When ready, slice into squares and enjoy the cool, creamy sensation.
Flavor Upgrades for a Cooler Chocolate Treat
Serve Eclair Cake That Slices Smoothly
Store Eclair Cake for Sweet Nights Ahead
FAQs
Absolutely! This no-bake chocolate eclair cake requires minimal cooking skills and just a few simple ingredients. Anyone can prepare it with basic kitchen tools and some patience.
Yes, it’s perfect for advance preparation. You can make it a day before serving, which actually helps the layers soften and flavors blend together. Just keep it refrigerated until serving time.
Not at all. You’ll only need a large mixing bowl, whisk, 9×13-inch baking dish, and a small saucepan for the chocolate topping. Standard kitchen equipment works perfectly.
Definitely! This dessert is crowd-pleasing, serves many people, and looks impressive without requiring complicated techniques. It’s a great make-ahead dessert that travels well and always gets compliments.
Print
Dreamy No Bake Chocolate Eclair Cake Recipe
- Total Time: 4 hours 15 minutes
- Yield: 13 1x
Description
Chocolate Eclair Cake blends graham crackers, pudding, and whipped cream into a dreamy dessert. Cool layers meld rich flavors, creating a simple yet elegant treat you’ll savor to the last creamy bite.
Ingredients
- 3 cups (720 ml) cold milk
- 2 boxes (3.4 oz, 96.4 g each) instant vanilla pudding mix
- 1 cup (240 ml) whipped topping (e.g., cool whip)
- 1 box (14.4 oz, 408.2 g) graham crackers (about 3 sleeves)
- 4 oz (120 g) semisweet chocolate, chopped
- ½ cup (120 ml) heavy cream
- 1 tbsp unsalted butter
- 2 tbsps corn syrup (optional, for shine)
Instructions
- Pudding Preparation: Whisk instant pudding mix with cold milk until thickened, blending whipped topping for a smooth, airy consistency.
- Layering Foundation: Arrange graham crackers in a rectangular dish, covering the entire bottom surface with whole and broken crackers.
- First Pudding Layer: Spread half the pudding mixture evenly over the initial graham cracker base, ensuring complete coverage.
- Second Cracker Layer: Position graham crackers atop the first pudding layer, creating a uniform surface.
- Final Pudding Application: Distribute remaining pudding mixture over the second cracker layer with gentle precision.
- Chocolate Glaze Creation: Simmer heavy cream, pour over chopped chocolate, allowing to rest briefly before stirring to achieve a glossy consistency.
- Glaze Finishing: Incorporate butter and corn syrup into the chocolate mixture, stirring until smooth and fully integrated.
- Topping and Chilling: Pour molten chocolate over the top layer, spreading evenly, then refrigerate for a minimum of four hours to allow layers to meld.
- Serving: Cut into elegant squares and present the chilled dessert.
Notes
- Chill Thoroughly: Refrigerate for at least 4-6 hours or overnight to allow graham crackers to soften completely and layers to meld together perfectly.
- Prevent Soggy Base: Use room temperature ingredients and pat graham crackers dry to maintain crisp texture and prevent excess moisture.
- Smooth Chocolate Glaze: Stir chocolate and cream gently to avoid air bubbles, creating a silky, glossy chocolate topping without graininess.
- Customize Dietary Needs: Swap graham crackers with gluten-free alternatives, use sugar-free pudding mix, or replace whipped topping with whipped coconut cream for alternative diet versions.
- Prep Time: 15 minutes
- Cook Time: 4 hours
- Category: Desserts, Snacks
- Method: None
- Cuisine: American
Nutrition
- Serving Size: 13
- Calories: 290
- Sugar: 16 g
- Sodium: 150 mg
- Fat: 18 g
- Saturated Fat: 10 g
- Unsaturated Fat: 6 g
- Trans Fat: 0 g
- Carbohydrates: 29 g
- Fiber: 1 g
- Protein: 4 g
- Cholesterol: 40 mg
Emily Lawson
Content Creator & Culinary Specialist
Expertise
Education
Oregon Culinary Institute
Diploma in Culinary Arts
Focus: Emphasis on farm-to-table cooking, sustainable practices, and the fusion of global flavors with traditional grilling methods.
Emily Lawson is the content creator at Daves Grill, turning tasty ideas into clear, easy recipes. Based in Portland, she trained at the Oregon Culinary Institute and loves cooking with fresh, seasonal ingredients, especially grilled veggies and global flavors.
Emily mixes food writing with hands-on cooking to bring you recipes that feel fun, not stressful. Her goal is to make every dish simple, flavorful, and worth coming back to. Together, she and Dave serve up real food, one recipe at a time.