
Indulgent Gooey Chocolate Candy Pizza Recipe: Sweet Bliss on a Crust
Chocolate lovers unite over this decadent chocolate candy pizza that blends the best of dessert worlds.
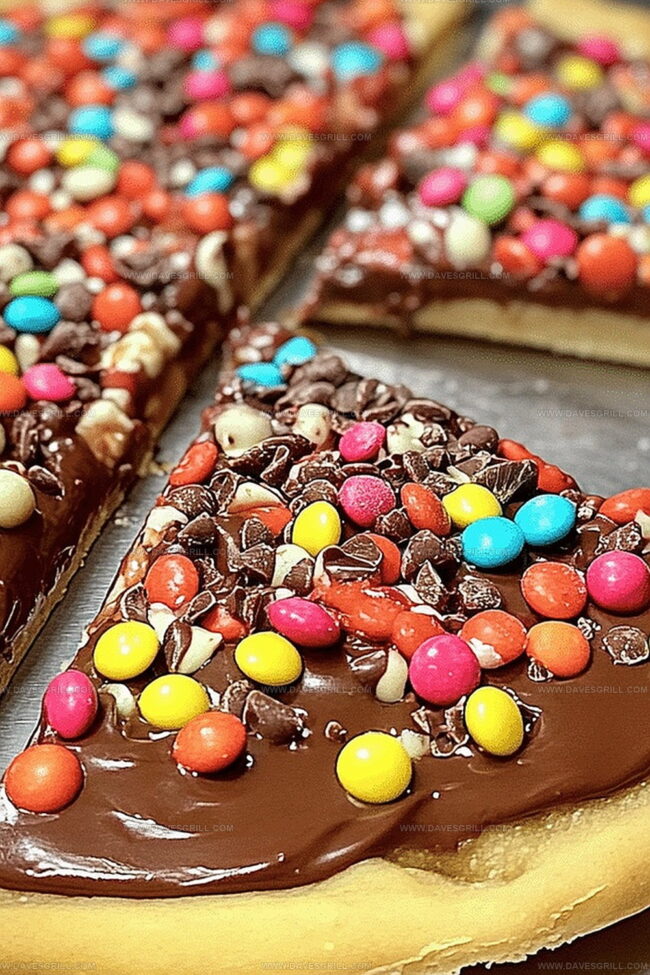
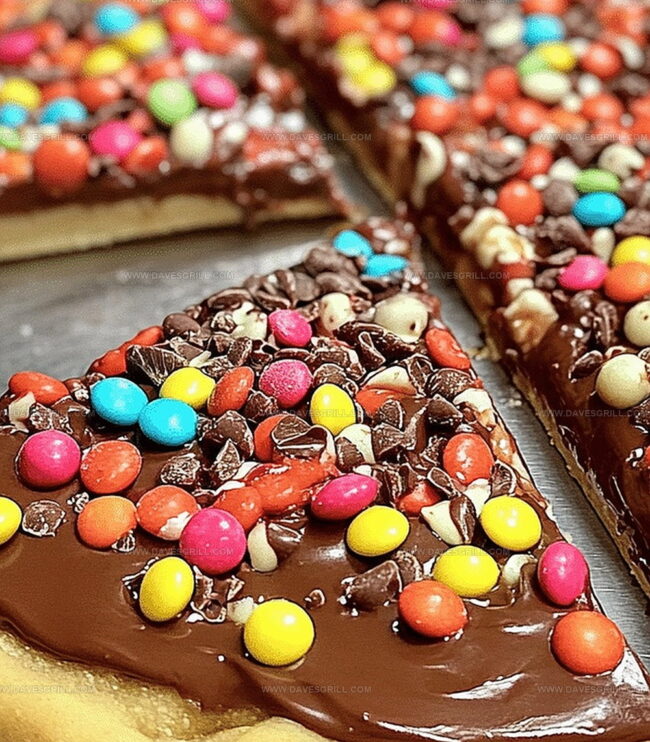
Sweet toppings cascade across a rich, crispy chocolate base that promises pure indulgence.
Each slice delivers a delightful crunch and melts smoothly in your mouth.
The combination of chocolate, candies, and a crunchy crust creates an irresistible treat perfect for parties or midnight snacking.
Colorful candy pieces add playful texture and visual appeal to this delectable dessert.
This recipe transforms a classic pizza concept into a sugary masterpiece that will have everyone asking for seconds.
Prepare to embark on a mouthwatering journey that celebrates chocolate in its most glorious form.
Quick Recipe Overview
Chocolate Candy Pizza Ingredient Breakdown
For Chocolate Base:For Topping Variety:For Decorative Finish:Tools for Crafting a Candy-Topped Pizza Treat
Assembling a Sweet Chocolate Candy Pizza
Grab a round pan and line it with parchment paper for your delicious chocolate adventure.
Pour melted chocolate into the pan, spreading it smoothly into a perfect circle about a quarter-inch thick.
Quickly sprinkle an exciting mix of marshmallows, colorful candies, crunchy pretzels, and sweet chips across the warm chocolate surface. Press toppings gently to make them stick.
Grab white and dark chocolate, then gracefully drizzle thin streams over your chocolate masterpiece for a stunning visual effect.
Allow your chocolate creation to harden by placing it in the refrigerator or letting it rest at room temperature for 1-2 hours.
Cut your chocolate pizza into wedges just like a traditional pizza and watch everyone’s eyes light up with excitement.
Personalize Candy Pizza With These Ideas
Slice and Serve Candy Pizza with Ease
Storage Tips for Chocolate Pizza Treats
Print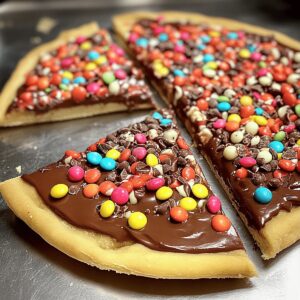
Gooey Chocolate Candy Pizza Recipe
- Total Time: 1 hour 10 minutes
- Yield: 13 1x
Description
Homemade chocolate candy pizza delivers a delightful dessert experience that blends sweet and indulgent flavors. Crisp chocolate crust topped with colorful candies creates a playful treat perfect for parties and casual gatherings.
Ingredients
- 12 oz (340 g) semi-sweet or milk chocolate, melted
- 2 oz (60 g) white chocolate, melted
- 2 oz (60 g) dark or milk chocolate, melted
- 1 cup crispy rice cereal (optional, for a crunchy base)
- ½ cup mini marshmallows
- ½ cup M&Ms or other colorful candies
- ¼ cup caramel or peanut butter chips
- ¼ cup chopped nuts (almonds, peanuts, or pecans)
- ¼ cup crushed pretzels
- ¼ cup shredded coconut (optional)
Instructions
- Preparation: Line a round pan with parchment paper or silicone mat, creating a smooth foundation for the chocolate canvas.
- Chocolate Base: Melt chocolate, optionally integrating rice cereal for textural intrigue, then pour and spread into a uniform circular layer approximately 1/4 inch thick using a spatula.
- Topping Arrangement: While chocolate remains malleable, strategically distribute mini marshmallows, M&Ms, pretzels, nuts, coconut, and caramel or peanut butter chips across the surface, gently pressing each element to anchor them within the molten chocolate.
- Decorative Drizzle: Elegantly cascade white and dark chocolate across the adorned surface, crafting sophisticated zigzag or swirl patterns that complement the existing toppings.
- Setting and Serving: Allow the chocolate creation to solidify completely by refrigerating or resting at room temperature for 1-2 hours, then carefully detach from the pan and slice into wedge-shaped segments, mimicking a traditional pizza presentation for delightful consumption.
Notes
- Choose Quality Chocolate: Select high-quality chocolate with at least 60% cocoa content for rich, smooth flavor and better melting performance.
- Control Melting Temperature: Melt chocolate slowly using double boiler or microwave in short intervals, stirring frequently to prevent burning and ensure silky texture.
- Balance Toppings Strategically: Distribute toppings evenly and press gently to create a balanced visual and textural experience, avoiding overcrowding or sparse areas.
- Customize for Dietary Needs: Substitute dairy-free chocolate for vegan version, use gluten-free pretzels, or replace nuts with seeds for allergy-friendly alternative.
- Prep Time: 10 minutes
- Cook Time: 1 hour
- Category: Desserts, Snacks
- Method: Baking
- Cuisine: American
Nutrition
- Serving Size: 13
- Calories: 267
- Sugar: 25 g
- Sodium: 60 mg
- Fat: 14 g
- Saturated Fat: 6 g
- Unsaturated Fat: 8 g
- Trans Fat: 0 g
- Carbohydrates: 34 g
- Fiber: 1 g
- Protein: 3 g
- Cholesterol: 5 mg
Emily Lawson
Content Creator & Culinary Specialist
Expertise
Education
Oregon Culinary Institute
Diploma in Culinary Arts
Focus: Emphasis on farm-to-table cooking, sustainable practices, and the fusion of global flavors with traditional grilling methods.
Emily Lawson is the content creator at Daves Grill, turning tasty ideas into clear, easy recipes. Based in Portland, she trained at the Oregon Culinary Institute and loves cooking with fresh, seasonal ingredients, especially grilled veggies and global flavors.
Emily mixes food writing with hands-on cooking to bring you recipes that feel fun, not stressful. Her goal is to make every dish simple, flavorful, and worth coming back to. Together, she and Dave serve up real food, one recipe at a time.