
Cheesy 7-Layer Taco Dip Recipe for Snack Tables
Weeknight dinners just got a delicious upgrade with this mouthwatering loaded 7 layer taco dip that promises to steal the show at your next gathering.
Layers of creamy, zesty goodness stack up to create a flavor explosion that’ll have everyone diving in for more.
Each scoop delivers a perfect blend of textures and tastes that dance across your palate.
The recipe combines classic Mexican-inspired ingredients with a fun, crowd-pleasing approach.
Packed with protein, fresh vegetables, and bold seasonings, this dip transforms an ordinary snack into an extraordinary experience.
You’ll love how simple it is to assemble these vibrant layers of deliciousness.
Grab a chip and get ready to become the party hero with this irresistible crowd-pleaser.
Quick Recipe Overview
What’s Inside the 7 Layer Taco Dip
For The Base Layer:For The Texture Builders:For The Flavor Enhancers:Tools You’ll Want for 7 Layer Taco Dip
How to Make 7 Layer Taco Dip at Home
Mix refried beans with taco seasoning until well combined. Spread the mixture evenly across the bottom of a serving dish, creating a smooth, flavorful base layer.
Dollop sour cream over the bean layer and gently spread it into an even coating, ensuring complete coverage of the beans.
Generously scatter taco seasoning over the sour cream layer, adding a burst of tangy flavor to the dip.
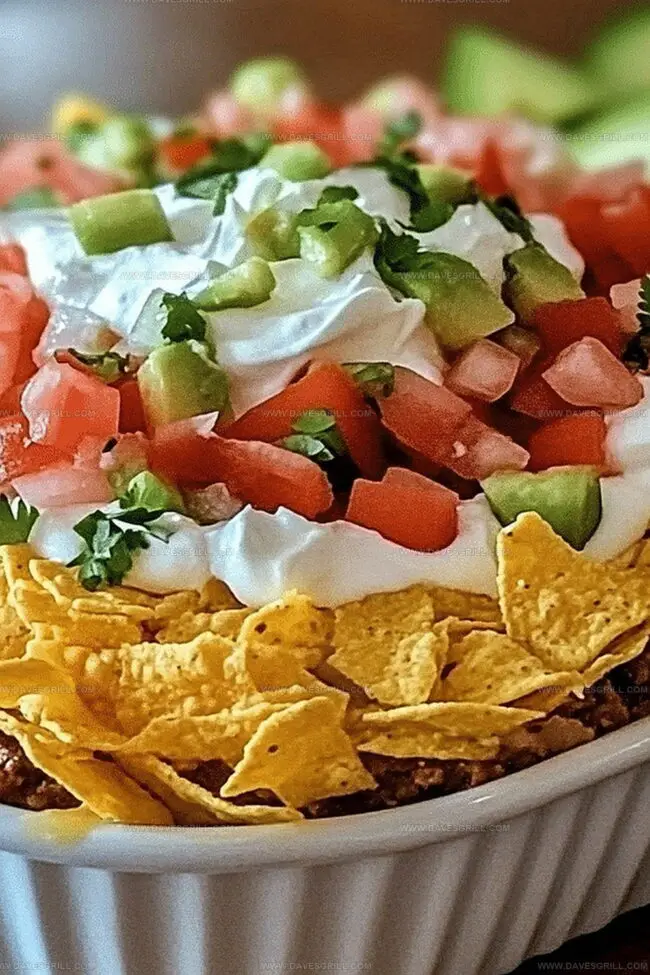
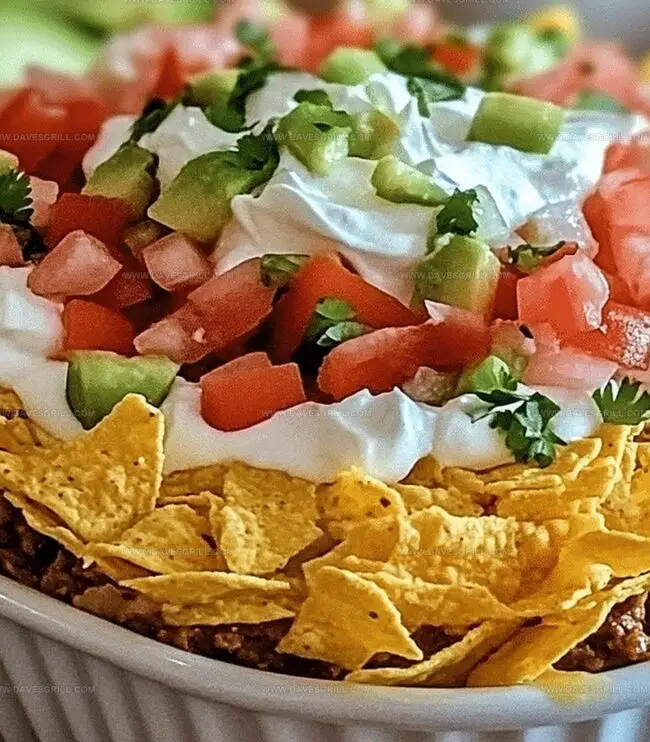
Distribute finely chopped lettuce and diced tomatoes across the surface, creating a vibrant and crisp layer of freshness.
Generously sprinkle shredded cheese over the vegetable layer, covering the entire surface with a blanket of melty goodness.
Finely chop green onions and sprinkle them across the cheese layer, adding a sharp and aromatic finish.
Complete the dip by scattering sliced black olives over the top, providing a final touch of color and savory flavor.
Pro Tips to Elevate Your 7 Layer Taco Dip
Serving Ideas for 7 Layer Taco Dip
Store and Plan Meals with 7 Layer Taco Dip
FAQs
The main ingredients include refried beans, taco seasoning, cream cheese, sour cream, salsa, shredded cheese, lettuce, and optional toppings like black olives and green onions.
Absolutely! This dip is perfect for gatherings, game days, potlucks, and casual get-togethers. It’s easy to make, visually appealing, and can be prepared ahead of time.
Yes, simply use vegetarian refried beans and omit any meat-based toppings. You can add extra vegetables like diced bell peppers or corn to enhance the flavor and nutrition.
Layer the ingredients carefully and chill the dip for 30 minutes before serving. Use a clean spatula or spoon when adding each layer, and spread gently to maintain distinct layers.
Print
Loaded 7 Layer Taco Dip Recipe
- Total Time: 45 minutes
- Yield: 9 1x
Description
Hearty 7 Layer Taco Dip brings Mexican-inspired flavors to party tables with layered culinary excellence. Guests will devour this crowd-pleasing appetizer that combines zesty ingredients in a delightful, colorful presentation perfect for sharing.
Ingredients
- 1 cup (240 grams) sour cream
- 1 cup (240 grams) guacamole
- 1 cup (240 grams) salsa (chunky preferred)
- 1 can (16 oz / 454 g) refried beans
- 1 cup (120 grams) shredded cheddar or Mexican blend cheese
- ½ cup (60 grams) diced tomatoes
- ¼ cup (30 grams) sliced black olives
- ¼ cup (30 grams) chopped green onions
- 1 packet (1 oz / 28 g) taco seasoning mix
- Tortilla chips, for serving
Instructions
- Seasoning Preparation: Whisk taco seasoning into refried beans, creating a zesty, well-integrated foundation for the dip.
- Base Layering: Evenly distribute the spiced bean mixture across the serving vessel, establishing a robust initial stratum that will support subsequent layers.
- Cream Cheese Application: Gently spread softened cream cheese over the bean layer, ensuring a smooth, consistent texture that complements the spicy undertones.
- Sour Cream Infusion: Dollop and carefully spread sour cream to create a cool, creamy dimension that balances the robust bean and seasoning base.
- Salsa Distribution: Sprinkle prepared salsa across the surface, allowing the vibrant tomato and pepper notes to peek through the creamy layers.
- Cheese Cascade: Generously shower shredded cheddar and monterey jack cheeses, creating a melty, golden blanket that adds rich, tangy complexity.
- Garnish Finale: Artfully arrange chopped green onions, sliced black olives, and diced tomatoes, transforming the dip into a visually stunning and flavor-packed appetizer ready for immediate enjoyment.
Notes
- Smooth Bean Spread: Use a rubber spatula or back of a spoon to create an even, flat layer of seasoned beans without gaps or peaks for perfect base coverage.
- Dish Selection Matters: Choose a clear glass dish to showcase vibrant layers or a white platter to make colorful ingredients pop, enhancing visual appeal.
- Seasoning Intensity: Adjust taco seasoning quantity based on personal spice preference, starting with half the packet and tasting before fully incorporating.
- Chill Before Serving: Refrigerate the dip for 30-60 minutes before serving to allow flavors to meld and create a firmer, more stable layered structure.
- Prep Time: 15 minutes
- Cook Time: 30 minutes
- Category: Appetizer, Snacks
- Method: None
- Cuisine: Mexican
Nutrition
- Serving Size: 9
- Calories: 274
- Sugar: 3 g
- Sodium: 580 mg
- Fat: 16 g
- Saturated Fat: 7 g
- Unsaturated Fat: 8 g
- Trans Fat: 0 g
- Carbohydrates: 24 g
- Fiber: 4 g
- Protein: 9 g
- Cholesterol: 30 mg
Emily Lawson
Content Creator & Culinary Specialist
Expertise
Education
Oregon Culinary Institute
Diploma in Culinary Arts
Focus: Emphasis on farm-to-table cooking, sustainable practices, and the fusion of global flavors with traditional grilling methods.
Emily Lawson is the content creator at Daves Grill, turning tasty ideas into clear, easy recipes. Based in Portland, she trained at the Oregon Culinary Institute and loves cooking with fresh, seasonal ingredients, especially grilled veggies and global flavors.
Emily mixes food writing with hands-on cooking to bring you recipes that feel fun, not stressful. Her goal is to make every dish simple, flavorful, and worth coming back to. Together, she and Dave serve up real food, one recipe at a time.