
Irresistibly Cheesy Pepperoni Pizza Rolls Recipe
Pizza lovers, these homemade pepperoni pizza rolls burst with cheesy, savory goodness that’ll make your taste buds dance.
Sarah’s secret recipe combines classic Italian flavors in a convenient, handheld snack perfect for game nights or quick meals.
Crispy edges and gooey centers create an irresistible texture that beats any store-bought version.
Minimal ingredients and simple steps mean you can whip up these delectable rolls in under 30 minutes.
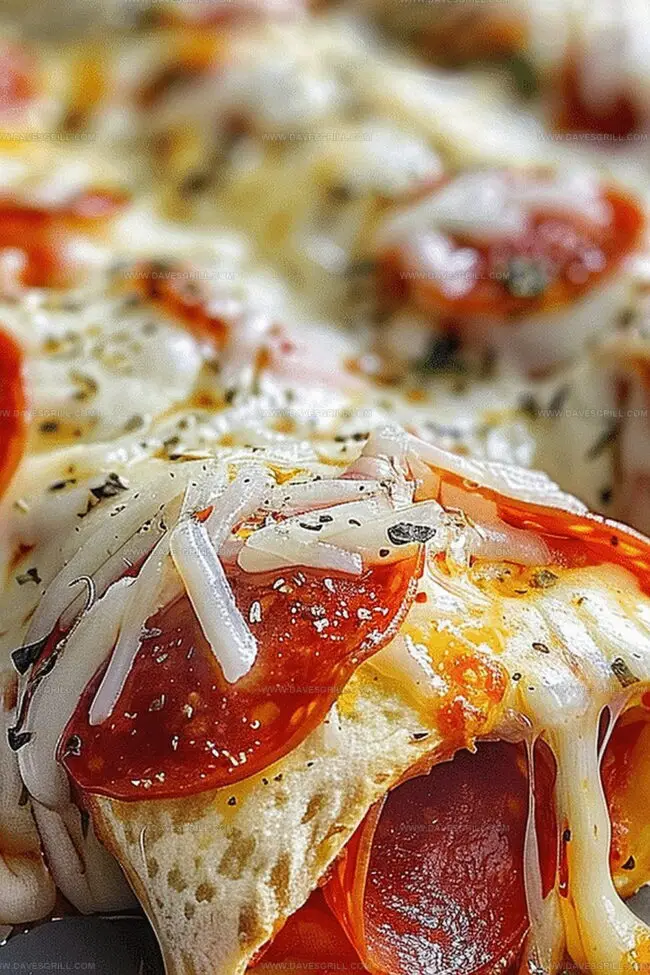
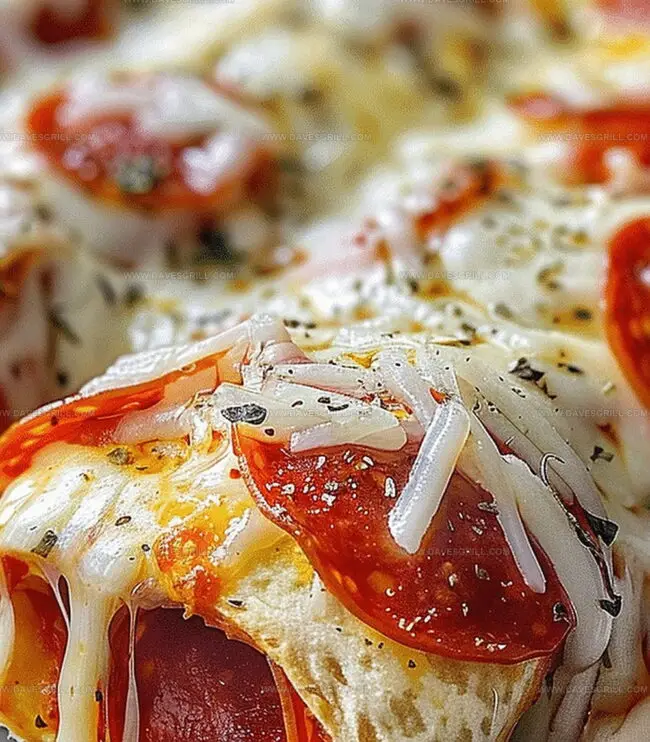
The combination of melted mozzarella, zesty pepperoni, and soft dough creates a comfort food masterpiece.
Warm, golden-brown rolls straight from the oven promise pure deliciousness that’ll have everyone asking for seconds.
You’ll want to bookmark this recipe as your new go-to crowd-pleaser.
Top Reasons People Love Pepperoni Pizza Rolls
Everything for Making Pepperoni Pizza Rolls
Main Ingredients:
Pizza Base:- Pizza Dough: Foundational layer for the entire recipe, creates the soft and chewy wrapper for the pizza rolls.
Protein and Cheese:- Pepperoni, Mozzarella Cheese: Classic pizza combination that delivers rich, savory flavor and stretchy melted texture.
Flavor Enhancers:- Pizza Sauce, Italian Seasoning, Garlic Powder: Adds depth of flavor and traditional pizza taste profile.
Cooking Accessories:- Olive Oil: Provides golden brown finish and extra moisture to the pizza rolls.
Preparation Support:- Sharp Knife: Essential for precise cutting of pizza roll slices.
Optional Serving:- Extra Pizza Sauce: Perfect accompaniment for dipping the finished pizza rolls.
How to Roll and Bake Pizza Rolls
Step 1: Crank Up The Oven
Set your oven to roast at 375F (190C). Make sure the rack is positioned in the center for even cooking.
Step 2: Unleash The Dough
Stretch out the pizza dough on a clean surface generously dusted with flour. Work the dough into a rectangular shape approximately 12×8 inches.
Step 3: Create Flavor Layers
Spread a thin coating of pizza sauce across the dough. Distribute pepperoni slices evenly. Sprinkle shredded mozzarella over the pepperoni. Add a dash of Italian seasoning and garlic powder for extra zest.
Step 4: Transform Into A Roll
Begin at one long edge and carefully roll the dough into a tight log. Press the seam firmly to seal and prevent ingredients from escaping during baking.
Step 5: Slice Into Bite-Sized Treasures
Using a sharp knife, cut the rolled dough into 1-inch thick rounds. Position the slices in a greased baking dish with slight spacing between each piece.
Step 6: Bake To Golden Perfection
Brush the tops with olive oil for a glossy finish. Slide the baking dish into the preheated oven. Bake for 15-20 minutes until the rolls turn golden brown and cheese melts completely.
Step 7: Serve With Excitement
Remove from oven and let cool briefly. Plate with extra pizza sauce for dipping. Devour immediately while warm and gooey!
Tips for Pepperoni Pizza Rolls
Keep Pizza Rolls Fresh After Serving
Best Sauces for Pepperoni Pizza Rolls
Different Takes on Pizza Rolls
Print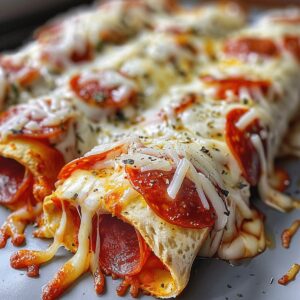
Pepperoni Pizza Rolls Recipe
- Total Time: 33 minutes
- Yield: 8 1x
Description
Pepperoni pizza rolls bring irresistible Italian-American comfort to snack time, combining zesty flavors in compact, cheesy bites. Crispy pastry wrapped around spicy pepperoni and melted cheese delivers a perfect handheld treat you’ll crave again and again.
Ingredients
Main Ingredients:
- 1 tube (13.8 ounces / 391 grams) refrigerated pizza dough (or homemade pizza dough)
- 1 ½ cups shredded mozzarella cheese
- ½ cup sliced pepperoni
- ½ cup pizza sauce
Cheese and Seasoning:
- ¼ cup grated Parmesan cheese
- 1 teaspoon Italian seasoning
- ¼ teaspoon garlic powder
Finishing Ingredients:
- 2 tablespoons unsalted butter, melted
- Additional pizza sauce for dipping
Instructions
- Prepare the workspace by heating the oven to 375F (190C), creating an ideal environment for transforming dough into crispy, savory rolls.
- Flatten the pizza dough on a lightly dusted surface, extending it to cover a standard baking sheet with a thin, uniform thickness.
- Distribute a light coating of pizza sauce across the dough, maintaining a small untouched border around the edges to prevent excessive leakage during baking.
- Strategically arrange pepperoni slices in an even pattern, covering the sauced surface with overlapping circles of spicy meat.
- Generously sprinkle mozzarella cheese over the pepperoni, ensuring complete coverage and creating a melty foundation for the rolls.
- Enhance the flavor profile by dusting the surface with Italian seasoning and a whisper of garlic powder for additional depth.
- Carefully roll the dough from one edge to another, creating a compact log while encasing the pepperoni and cheese within.
- Seal the seam by pressing the edges together, preventing ingredients from escaping during the baking process.
- Slice the rolled dough into uniform 1-inch segments using a sharp knife, creating individual bite-sized pizza rolls.
- Position the rolls in a greased baking dish, allowing slight separation between each piece to promote even cooking.
- Optional: Brush the tops with olive oil to promote a golden, glossy finish.
- Bake in the preheated oven for 15-20 minutes until the rolls transform into a golden-brown delicacy with bubbling, melted cheese.
- Allow the rolls to rest for a few minutes after removing from the oven, then serve immediately with additional pizza sauce for dipping.
Notes
- Swap pepperoni for turkey pepperoni or vegetarian alternatives to create lighter, diet-friendly versions that still pack incredible flavor.
- Experiment with different cheese combinations like cheddar, provolone, or goat cheese to add unique taste profiles and exciting texture variations.
- Prevent soggy rolls by patting pepperoni slices dry with paper towels before layering, which helps reduce excess moisture during baking.
- Enhance nutritional value by incorporating finely chopped spinach, mushrooms, or bell peppers into the cheese and pepperoni filling for added vegetables.
- Prep Time: 15 minutes
- Cook Time: 18 minutes
- Category: Snacks, Appetizer, Lunch
- Method: Baking
- Cuisine: Italian
Nutrition
- Serving Size: 8
- Calories: 300
- Sugar: 2 g
- Sodium: 680 mg
- Fat: 16 g
- Saturated Fat: 8 g
- Unsaturated Fat: 6 g
- Trans Fat: 0 g
- Carbohydrates: 30 g
- Fiber: 1 g
- Protein: 12 g
- Cholesterol: 30 mg
Dave Mitchell
Founder & Chief Recipe Developer
Expertise
Education
Asheville-Buncombe Technical Community College
Associate of Applied Science in Culinary Arts
Focus: Comprehensive training in culinary techniques, kitchen management, and menu planning, with a special emphasis on grilling and outdoor cooking.
Dave Mitchell is the heart behind Daves Grill, a cook, writer, and lover of all things grilled. He studied Culinary Arts at Asheville-Buncombe Technical Community College and spent years cooking, testing, and sharing recipes that actually work.
Dave started Daves Grill to keep things simple: one great recipe at a time. His food is bold, easy to follow, and made for real people with regular kitchens. From juicy steaks to quick sides, Dave’s recipes bring the heat without the hassle.