
Irresistible Pillsbury Biscuit Garlic Butter Cheese Bombs Recipe
Pillsbury biscuits turn into magical garlic butter cheese bombs that dance with flavor right in your kitchen.
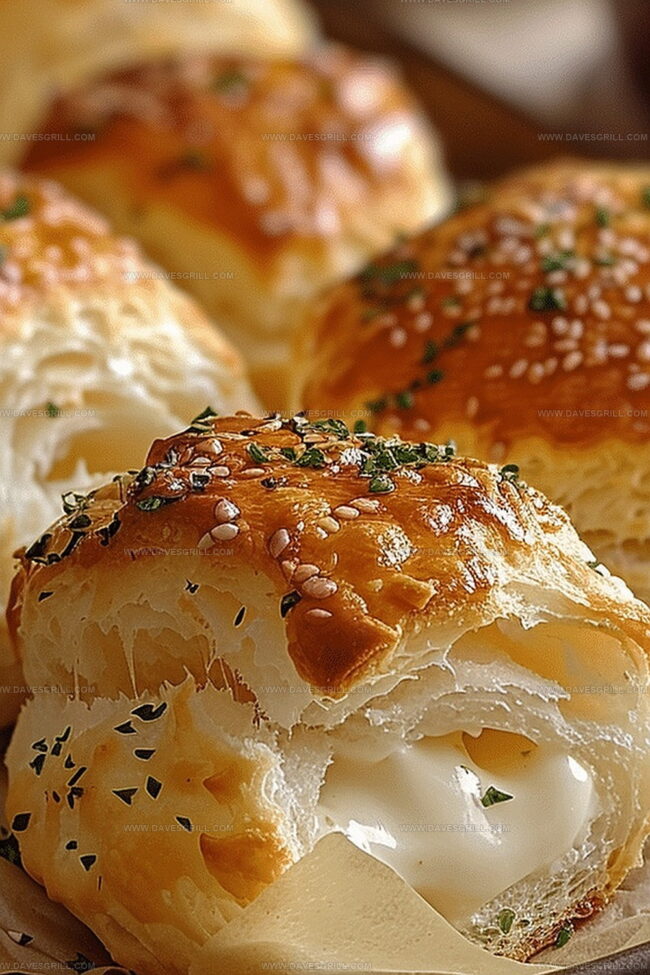
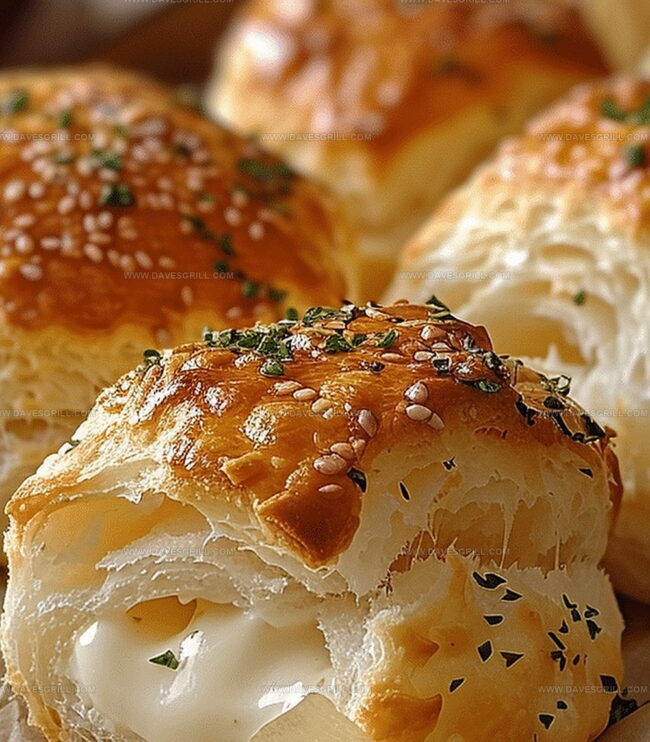
Crispy golden exteriors hide melting cheese centers waiting to surprise you.
Creamy, rich, and impossibly addictive, these little bites pack serious taste punch.
Cheese lovers will absolutely swoon over how simple yet spectacular these are.
Quick weeknight snacks rarely come together this effortlessly and deliciously.
Home cooks can master this recipe with just a few pantry staples and minimal effort.
Warm, gooey, and irresistible – these bombs will disappear faster than you can say “seconds”!
Why Pillsbury Biscuit Garlic Butter Cheese Bombs Are Addictive
Ingredients You’ll Need for Garlic Butter Bombs
Biscuit Base:Cheese Ingredients:Flavor Enhancers:Optional Serving Companion:Baking Instructions for Pillsbury Biscuit Cheese Bombs
Step 1: Prep the Oven
Heat the oven to 375°F (190°C). Cover a baking sheet with parchment paper.
Step 2: Open and Flatten Biscuits
Tear open the biscuit container and separate each biscuit. Gently press down on each one to create a slightly wider circle.
Step 3: Create Cheese Pockets
Ingredients for filling:Place a cheese cube right in the center of each biscuit. Carefully fold the dough over the cheese, pinching edges completely closed. Shape into a smooth ball with the sealed side facing down on the baking sheet.
Step 4: Whip Up Garlic Butter Mixture
Ingredients:Mix all ingredients in a small bowl until well combined.
Step 5: Coat Biscuit Bombs
Brush each dough ball generously with the garlic butter mixture. Sprinkle Parmesan cheese on top of each bomb.
Step 6: Bake to Golden Perfection
Place the baking sheet in the oven. Bake for 10-12 minutes until the bombs turn a beautiful golden brown and cheese melts inside.
Step 7: Final Flavor Boost
After removing from the oven, brush the bombs with remaining garlic butter. Scatter fresh parsley on top if you’d like.
Step 8: Serve and Enjoy
Plate these delicious bombs while warm. Offer marinara sauce on the side for dipping. Savor every cheesy, buttery bite!
Tips for Golden Biscuits and Gooey Cheese
How to Store Pillsbury Garlic Butter Cheese Bombs the Right Way
What to Serve with Cheese Bombs for a Comfort Meal
Flavor Upgrades for Pillsbury Cheese Bombs
Gluten-Free Garlic Cheese Bombs: Replace Pillsbury biscuits with gluten-free biscuit mix or almond flour dough for those with wheat sensitivities.
Vegan Cheese Delight: Substitute mozzarella with vegan cheese alternatives like cashew or coconut-based cheese, using plant-based butter for the garlic coating.
Low-Carb Cheese Pockets: Swap traditional biscuits with cauliflower-based dough or lettuce wraps, using reduced-fat cheese and olive oil instead of butter.
Spicy Jalapeño Version: Add diced jalapeños inside the cheese bombs or mix into the garlic butter for a zesty, heat-packed variation that kicks up the flavor profile.
Print
Pillsbury Biscuit Garlic Butter Cheese Bombs Recipe
- Total Time: 22 minutes
- Yield: 8 1x
Description
Pillsbury biscuit garlic butter cheese bombs deliver irresistible cheesy comfort with a golden, crispy exterior that melts hearts instantly. Garlic-infused butter and gooey cheese create a simple yet spectacular side dish you cannot resist devouring.
Ingredients
Main Ingredients:
- 1 can (16.3 oz / 462 g) Pillsbury Grands!TM Flaky Layers biscuits (8 biscuits)
- 8 small cubes of mozzarella cheese (or string cheese cut into pieces)
Cheese and Seasoning:
- ¼ cup (60 ml) grated Parmesan cheese
- ½ teaspoon Italian seasoning
Garlic Butter Ingredients:
- ¼ cup (57 g) unsalted butter, melted
- 2 cloves garlic, minced
- Fresh parsley, chopped, for garnish (optional)
Instructions
- Prepare the oven environment by heating to 375F (190C) and lining a baking sheet with parchment paper for optimal baking conditions.
- Carefully separate each biscuit from the can and gently flatten with fingertips to create a smooth, workable surface.
- Position a rich cube of mozzarella precisely in the center of each biscuit disk, ensuring complete coverage with dough by carefully folding edges and sealing tightly to create seamless, compact spheres.
- Craft a fragrant garlic butter mixture by blending melted butter with finely minced garlic and aromatic Italian seasoning, stirring until fully incorporated.
- Apply the infused garlic butter generously across each dough sphere, using a pastry brush to ensure complete coverage, then delicately dust with grated Parmesan cheese for an extra layer of flavor.
- Transfer the prepared baking sheet into the preheated oven, allowing the bombs to transform into golden-brown treasures with molten cheese centers during a 10-12 minute baking cycle.
- Once removed from the oven, immediately enhance the bombs with a final luxurious brushing of remaining garlic butter and optional fresh parsley garnish.
- Present these delectable cheese bombs while warm, accompanied by a side of marinara sauce for an indulgent dipping experience that elevates the entire culinary creation.
Notes
- Seal the cheese completely inside the dough to prevent leakage during baking, ensuring a perfect molten cheese center in every bite.
- Use room temperature cheese for more even melting and a smoother interior texture that oozes deliciously when you bite into the biscuit bomb.
- Experiment with different cheese varieties like cheddar, pepper jack, or Swiss to create unique flavor combinations that suit your taste preferences.
- For a gluten-free option, substitute Pillsbury biscuits with gluten-free biscuit dough or use refrigerated gluten-free crescent roll dough as an alternative base.
- Prep Time: 10 minutes
- Cook Time: 12 minutes
- Category: Appetizer, Snacks
- Method: Baking
- Cuisine: American
Nutrition
- Serving Size: 8
- Calories: 260
- Sugar: 1 g
- Sodium: 580 mg
- Fat: 20 g
- Saturated Fat: 12 g
- Unsaturated Fat: 6 g
- Trans Fat: 0 g
- Carbohydrates: 18 g
- Fiber: 0 g
- Protein: 6 g
- Cholesterol: 40 mg
Dave Mitchell
Founder & Chief Recipe Developer
Expertise
Education
Asheville-Buncombe Technical Community College
Associate of Applied Science in Culinary Arts
Focus: Comprehensive training in culinary techniques, kitchen management, and menu planning, with a special emphasis on grilling and outdoor cooking.
Dave Mitchell is the heart behind Daves Grill, a cook, writer, and lover of all things grilled. He studied Culinary Arts at Asheville-Buncombe Technical Community College and spent years cooking, testing, and sharing recipes that actually work.
Dave started Daves Grill to keep things simple: one great recipe at a time. His food is bold, easy to follow, and made for real people with regular kitchens. From juicy steaks to quick sides, Dave’s recipes bring the heat without the hassle.