
Cozy Homemade Rustic Olive Bread Recipe – Warm Kitchen Magic
Baking aromas fill the kitchen with warmth when you knead olive bread that connects generations of Mediterranean culinary traditions.
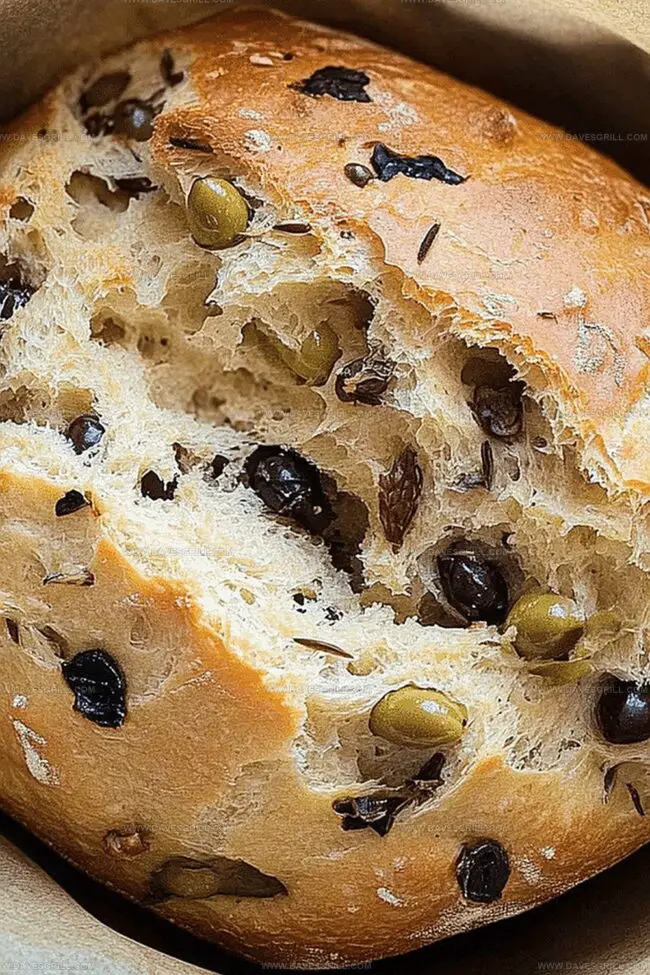
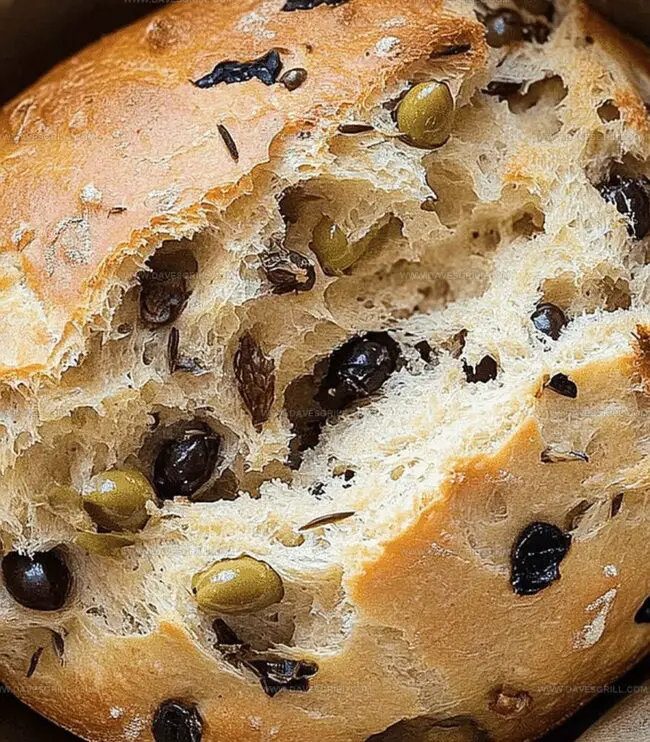
Crusty and dense, this rustic loaf carries the soul of simple ingredients blended with passion.
Salt-studded olives burst through the golden-brown crust, creating pockets of briny flavor.
Each slice tells a story of sunshine-drenched olive groves and old-world baking techniques.
Handcrafted with minimal effort, this bread transforms ordinary meals into memorable experiences.
Wild yeast and carefully chosen olives dance together, promising a sensory journey.
Prepare to savor every crumb of this authentic, comforting bread that beckons you to the table.
Quick Recipe Overview
Olive Bread Ingredient Checklist
For Activating Yeast:For Bread Base:For Flavor Boosters:Tools You’ll Need for Olive Bread Success
Make Olive Bread from Scratch with Ease
Sprinkle yeast into warm water with a touch of sweetness. Let the mixture dance and bubble for a few minutes until it looks alive and frothy.
Mix flour and a pinch of salt in a big bowl. Pour in theal yeast mixture and a splash of olive oil. Stir until everything comes together into a sticky, promising dough.
Gently work in chopped olives and a sprinkle of fragrant herbs. Knead the dough on a flour-dusted surface, transforming it into a smooth, stretchy masterpiece. Push and fold until the texture feels just right.
Tuck the dough into a cozy, oiled bowl. Cover it with a soft cloth and let it hang out in a warm spot. Watch it grow and double in size over the next couple of hours.
Gently deflate the puffy dough and mold it into a beautiful round or oval shape. Place it on a baking sheet lined with parchment paper.
Give the dough one more chance to puff up, covering it loosely. Meanwhile, fire up the oven to a toasty 400F.
Slide the bread into the hot oven. Bake until the crust turns a gorgeous golden brown and tapping the bottom sounds hollow and crisp.
Let the bread rest on a wire rack. Slice when it’s cooled down and savor the delicious results of your baking adventure.
Techniques That Boost Olive Bread Flavor
Olive Bread Serving Ideas That Work
How to Store Olive Bread the Right Way
FAQs
Black or green olives are both excellent choices. Kalamata olives provide a rich, tangy flavor that complements the herbs perfectly. Choose pitted olives and chop them into small, uniform pieces for even distribution in the bread.
Absolutely! While a stand mixer makes kneading easier, you can knead the dough by hand on a floured surface. Hand kneading takes about 8-10 minutes and helps develop the gluten, creating a better bread texture.
The yeast mixture should become frothy and bubbly within 5-10 minutes. If it doesn’t foam or looks flat, the yeast might be old or the water temperature was incorrect. Fresh yeast and warm (not hot) water are key to successful activation.
Yes, the two-rise process is crucial. The first rise allows the yeast to develop flavor and texture, while the second rise helps the bread achieve its final shape and volume before baking. Skipping either rise will result in dense, flat bread.
Print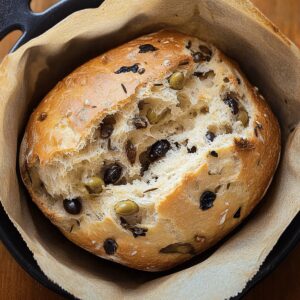
Rustic Olive Bread Recipe
- Total Time: 55 minutes
- Yield: 13 1x
Description
Mediterranean classic olive bread brings rustic charm to your table with briny kalamata olives and aromatic herbs. Hearty slices promise rich flavor and crisp texture that will transport diners to sunny Greek coastal landscapes.
Ingredients
- 3.5 cups (440 g) all-purpose flour
- 1.5 cups (360 ml) warm water (110°F/43°C)
- 1 cup (150 g) pitted olives, chopped (black, green, or a mix)
- 1 packet (2.25 tsps) active dry yeast
- 2 tbsps olive oil
- 2 tsps salt
- 1 tsp dried rosemary (or 1 tbsp fresh, chopped)
- 1 tsp dried oregano
- 1 tsp sugar
Instructions
- Yeast Activation: Whisk yeast with warm liquid and a touch of sweetener, letting the mixture transform into a foamy elixir for about 8 minutes.
- Dough Formation: Craft a flour landscape in a generous mixing bowl, integrating salt and creating a central reservoir for the activated yeast and olive oil, then fold in chopped Mediterranean olives, rosemary, and oregano to infuse robust flavors throughout the dough.
- Kneading Technique: Migrate the dough to a flour-dusted surface, executing rhythmic kneading motions until achieving a silky, responsive texture that elastically rebounds when pressed.
- First Fermentation: Nestle the dough in a lightly oiled ceramic vessel, shroud with a pristine cloth, and position in a tranquil, warm sanctuary to encourage luxurious expansion for 90 minutes.
- Shaping and Second Rise: Gently deflate the risen dough, sculpt into a rustic round or elegant oval on parchment-lined terrain, then allow a secondary proofing period to enhance structural complexity.
- Baking Preparation: Calibrate the oven to 400 degrees Fahrenheit, creating a transformative environment that will metamorphose the raw dough into a golden, crusty masterpiece.
- Final Transformation: Bake until the exterior radiates a rich, burnished golden tone and emits a hollow percussion when tapped, signaling perfect internal development. Transfer to a wire rack, allowing the bread to stabilize and reach its ultimate textural potential before serving.
Notes
- Master Yeast Activation: Ensure tepid liquid (around 110°F) to activate yeast without killing it; too hot water will destroy yeast’s living organisms.
- Optimize Dough Consistency: Knead until dough becomes elastic and smooth, windowpane test indicates proper gluten development – stretch a small piece, it should thin without breaking.
- Prevent Dry Surface: Cover dough during rising with damp cloth or plastic wrap to maintain moisture and prevent skin formation that blocks proper expansion.
- Enhance Flavor Complexity: Toast olives briefly before adding to intensify their Mediterranean profile and reduce excess moisture that might impact dough’s structural integrity.
- Prep Time: 20 minutes
- Cook Time: 35 minutes
- Category: Snacks, Appetizer, Breakfast
- Method: Baking
- Cuisine: Mediterranean
Nutrition
- Serving Size: 13
- Calories: 200
- Sugar: 0.5 g
- Sodium: 170 mg
- Fat: 4.5 g
- Saturated Fat: 0.5 g
- Unsaturated Fat: 4 g
- Trans Fat: 0 g
- Carbohydrates: 37 g
- Fiber: 1.5 g
- Protein: 6 g
- Cholesterol: 0 mg
Emily Lawson
Content Creator & Culinary Specialist
Expertise
Education
Oregon Culinary Institute
Diploma in Culinary Arts
Focus: Emphasis on farm-to-table cooking, sustainable practices, and the fusion of global flavors with traditional grilling methods.
Emily Lawson is the content creator at Daves Grill, turning tasty ideas into clear, easy recipes. Based in Portland, she trained at the Oregon Culinary Institute and loves cooking with fresh, seasonal ingredients, especially grilled veggies and global flavors.
Emily mixes food writing with hands-on cooking to bring you recipes that feel fun, not stressful. Her goal is to make every dish simple, flavorful, and worth coming back to. Together, she and Dave serve up real food, one recipe at a time.