
Dreamy Silky Peppermint Cheesecake Recipe for Sweet Lovers
Decadent desserts often spark joy, and this peppermint cheesecake blends creamy richness with festive winter flavors.
Cool mint dancing through smooth cream cheese creates an irresistible holiday treat.
Delicate peppermint swirls elevate this classic dessert into something extraordinary.
Each bite promises a perfect balance of sweet and refreshing notes.
The silky texture melts smoothly across your palate, leaving a delightful hint of cool mint.
Guests will swoon over this elegant and indulgent cheesecake that transforms an ordinary gathering into a memorable celebration.
Prepare to dazzle everyone with this show-stopping dessert that combines comfort and sophistication.
Quick Recipe Overview
What You Need for No-Bake Peppermint Cheesecake
For Crust:For Cheesecake Filling:For Topping:Cooking Equipment for No-Bake Peppermint Cheesecake
Making It Happen for No-Bake Peppermint Cheesecake
Crush chocolate cookies into fine crumbs and blend with melted butter. Press mixture firmly into springform pan’s bottom, creating a solid foundation. Pop pan into refrigerator while preparing delicious filling.
Beat cream cheese until silky smooth, blending in powdered sugar and peppermint extract. Separately, whip heavy cream to fluffy peaks. Gently fold whipped cream into cream cheese mixture, keeping everything light and airy. Sprinkle crushed candy canes throughout for bursts of minty flavor.
Pour creamy mixture over chilled crust, smoothing surface with gentle strokes. Cover carefully and refrigerate for several hours until filling becomes firm and set.
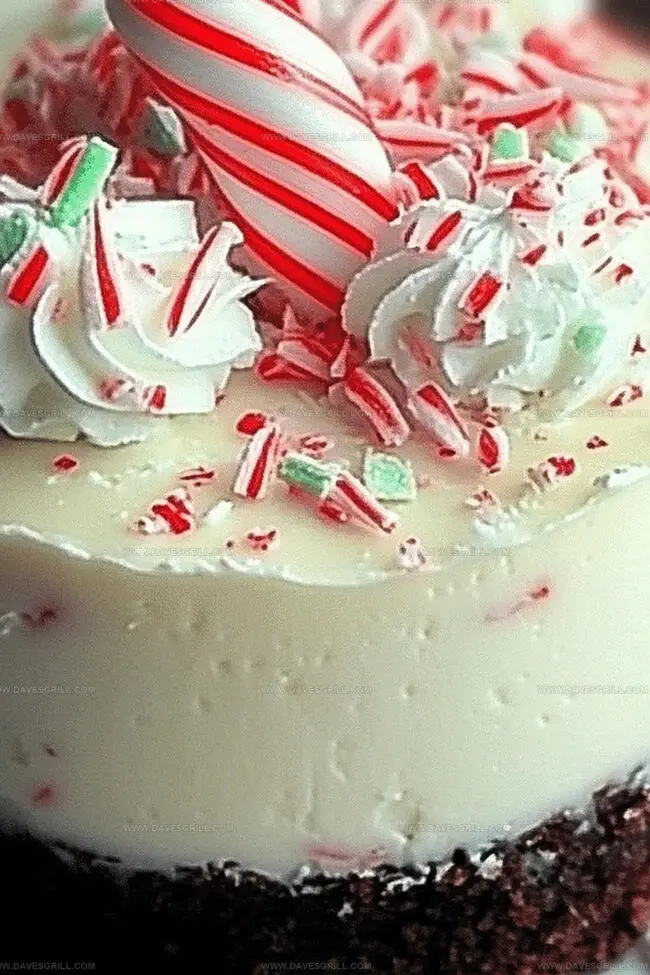
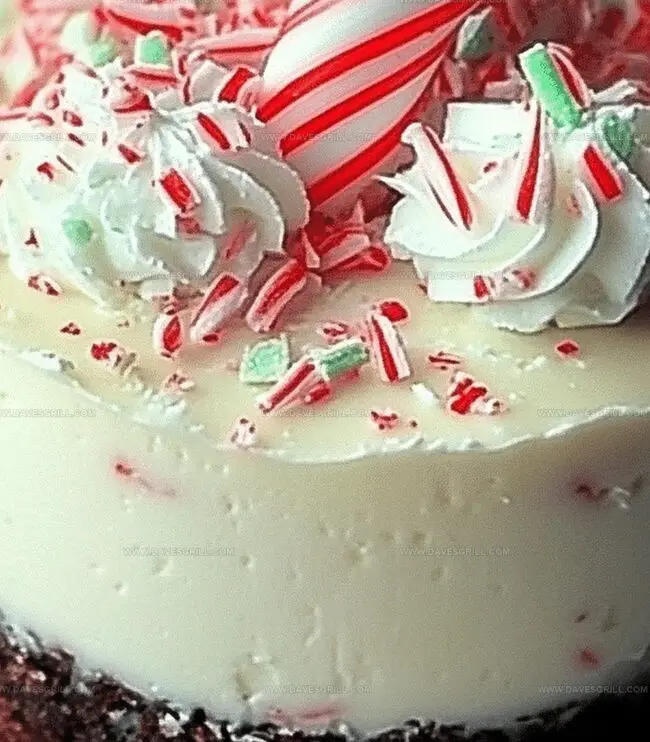
Before serving, crown cheesecake with dollops of whipped cream. Scatter extra crushed candy canes or chocolate shavings on top. Slice and savor the cool, refreshing peppermint delight.
Ideas to Try for No-Bake Peppermint Cheesecake
Plate It Right for No-Bake Peppermint Cheesecake
Plan + Store Smart for No-Bake Peppermint Cheesecake
Print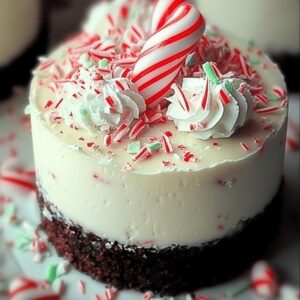
Silky Peppermint Cheesecake Recipe
- Total Time: 4 hours 20 minutes
- Yield: 9 1x
Description
Creamy no-bake peppermint cheesecake blends classic dessert flavors with festive holiday cheer. Cool mint and rich cream cheese create a delightful treat you’ll savor with pure winter joy.
Ingredients
- 16 ounces (454 grams) cream cheese, softened
- 2 cups (480 ml) heavy whipping cream, cold
- 2 cups (480 ml) chocolate cookie crumbs (such as Oreos, finely crushed)
- 1 cup (120 grams) powdered sugar
- 6 tablespoons (85 grams) unsalted butter, melted
- 1 teaspoon peppermint extract
- ½ cup (60 grams) crushed candy canes or peppermint candies
- Whipped cream (optional)
- Additional crushed candy canes (optional)
- Chocolate shavings (optional)
Instructions
- Crust Creation: Pulverize cookies into fine crumbs and amalgamate with melted butter, pressing the mixture firmly and evenly into the springform pan’s base to form a compact foundation.
- Filling Preparation: Blend cream cheese and powdered sugar until achieving a velvety smooth consistency, then infuse with peppermint extract to develop an invigorating flavor profile.
- Cream Integration: Whip heavy cream to stiff peaks, then gently fold into the cream cheese mixture, maintaining a light and airy texture while ensuring thorough incorporation.
- Candy Cane Dispersion: Delicately fold crushed candy canes throughout the filling, distributing the peppermint pieces uniformly for an even burst of festive flavor.
- Assembly and Chilling: Carefully spread the peppermint-studded filling over the chilled crust, smoothing the surface to create a pristine appearance, then refrigerate for a minimum of 4 hours to allow complete setting.
- Final Flourish: Prior to serving, embellish the cheesecake with a lavish topping of whipped cream, additional crushed candy canes, or elegant chocolate shavings to elevate the visual and gustatory experience.
Notes
- Crush Cookies Carefully: Use a food processor or rolling pin to create fine, even crumbs for a perfectly compact crust that holds together seamlessly.
- Prevent Cream Cheese Lumps: Ensure cream cheese is at room temperature and beat thoroughly to achieve a smooth, silky texture without any unwanted chunks.
- Fold Gently: Use a gentle folding motion when combining whipped cream and cream cheese to maintain the light, airy consistency that makes this cheesecake so delightful.
- Chill Completely: Allow the cheesecake to set in the refrigerator for at least 4 hours, or preferably overnight, to develop the best flavor and ideal creamy texture.
- Prep Time: 20 minutes
- Cook Time: 4 hours
- Category: Desserts
- Method: None
- Cuisine: American
Nutrition
- Serving Size: 9
- Calories: 400
- Sugar: 22 g
- Sodium: 250 mg
- Fat: 30 g
- Saturated Fat: 18 g
- Unsaturated Fat: 10 g
- Trans Fat: 0 g
- Carbohydrates: 35 g
- Fiber: 1 g
- Protein: 4 g
- Cholesterol: 90 mg
Emily Lawson
Content Creator & Culinary Specialist
Expertise
Education
Oregon Culinary Institute
Diploma in Culinary Arts
Focus: Emphasis on farm-to-table cooking, sustainable practices, and the fusion of global flavors with traditional grilling methods.
Emily Lawson is the content creator at Daves Grill, turning tasty ideas into clear, easy recipes. Based in Portland, she trained at the Oregon Culinary Institute and loves cooking with fresh, seasonal ingredients, especially grilled veggies and global flavors.
Emily mixes food writing with hands-on cooking to bring you recipes that feel fun, not stressful. Her goal is to make every dish simple, flavorful, and worth coming back to. Together, she and Dave serve up real food, one recipe at a time.