
Taco Bell Beefy Melt Burrito Recipe for Home
Crafting a homemade taco bell beefy melt burrito brings culinary adventure right to your kitchen.
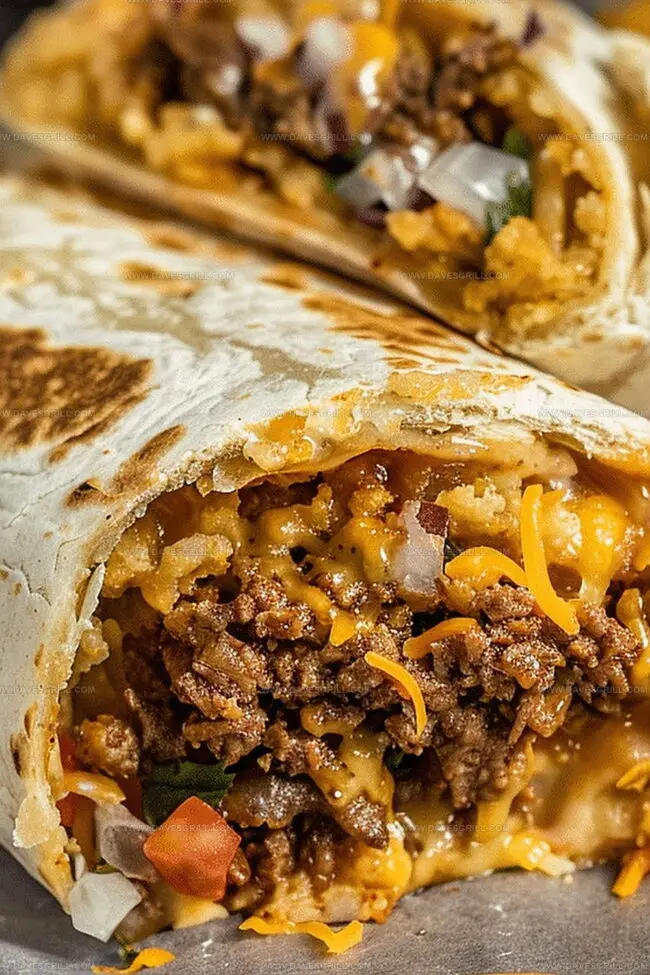
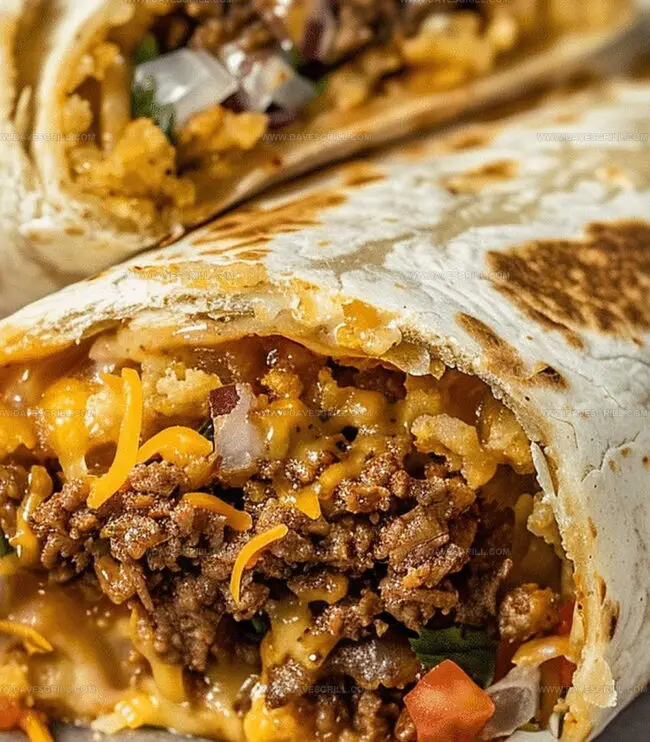
Layers of seasoned beef, melted cheese, and zesty sauce create a flavor explosion that rivals any restaurant version.
Mexican-inspired comfort food rarely gets more satisfying than this hearty wrap.
Spice levels can easily be adjusted to match personal preferences.
Bold ingredients combine effortlessly for a quick and delicious meal.
Each bite delivers a perfect balance of textures and bold southwestern flavors.
Recreate this fast-food favorite with simple ingredients and minimal cooking skills.
You’ll want to savor every single delicious morsel of this incredible burrito.
Taco Bell Beefy Melt Burrito Copycat Done Right
Beefy Burrito Ingredients You’ll Need
Protein Components:Base Components:Topping and Flavor Enhancers:Wrap and Cook Steps for Taco Bell Style
Step 1: Sizzle The Savory Beef
Cook ground beef in a skillet over medium heat, breaking it into crumbly pieces. Let the meat brown beautifully. Drain excess grease, then sprinkle taco seasoning and add water. Stir until every morsel gets coated with zesty flavor. Allow the mixture to simmer and develop rich taste for about 5 minutes.
Step 2: Jazz Up The Rice
Warm freshly cooked or leftover rice. Boost its flavor by mixing in:Step 3: Build Your Flavor Explosion
Prepare your tortilla canvas by warming it gently. Layer ingredients with precision:Step 4: Wrap Like A Pro
Fold tortilla sides strategically over fillings. Roll from bottom upward, creating a tight burrito package. For extra crispiness, toast the burrito in a hot skillet for 1-2 minutes on each side until golden brown.
Tips for That Cheesy Burrito Finish
Reheating Burritos Without Drying Them Out
Favorite Sides for Beefy Burritos
Fillings and Add-Ins to Shake Things Up
Print
Taco Bell Beefy Melt Burrito Recipe
- Total Time: 30 minutes
- Yield: 4 1x
Description
Taco Bell’s beefy melt burrito brings Mexican-inspired comfort straight to home kitchens with bold flavors and cheesy goodness. Packed with seasoned ground beef, melted cheese, and classic toppings, you can easily recreate this fan-favorite fast-food classic in just minutes.
Ingredients
Main Ingredients:
- 1 lb (450g) ground beef
- 4 large flour tortillas (burrito-sized)
- 1 cup (240ml) nacho cheese sauce
Seasonings and Spices:
- 1 packet (1 oz) taco seasoning mix
- 1 tsp taco seasoning
- ¼ cup (15g) chopped fresh cilantro (optional)
Additional Ingredients:
- 1 cup (185g) long-grain white rice
- 2 cups (480ml) water
- 1 tablespoon butter
- 1 cup (100g) shredded three-cheese blend (cheddar, Monterey Jack, mozzarella)
- 1 cup (40g) crunchy tortilla strips or crushed nacho chips
- Sour cream (for serving, optional)
- ½ cup (120ml) water
Instructions
- Sizzle ground beef in a skillet over medium flame, methodically crumbling and separating meat particles until uniform brown coloration develops.
- Eliminate excess grease, then incorporate taco seasoning with minimal water, stirring thoroughly to ensure comprehensive meat coating. Allow mixture to gently bubble for several minutes, developing robust flavor profile.
- Prepare rice with optional enhancement by blending nacho cheese sauce or taco seasoning directly into grains, creating additional taste complexity.
- Gently warm tortillas to maximize pliability and prevent potential cracking during assembly.
- Create flavor foundation by spreading nacho cheese sauce across tortilla center with smooth, consistent motion.
- Layer ingredients strategically: first seasoned beef, followed by rice, then sprinkle shredded cheese, add sour cream dollop, and distribute crunchy tortilla strips for textural variation.
- Execute precise wrapping technique by folding tortilla sides inward, then rolling from bottom edge upward, ensuring compact, secure burrito formation.
- Optional finishing touch involves brief skillet toasting, rotating burrito to achieve golden-brown exterior and crisp texture, approximately one to two minutes per side.
Notes
- Select lean ground beef to reduce excess fat and create a healthier version of the burrito.
- Experiment with ground turkey or plant-based meat alternatives for a lighter protein option that maintains similar flavor profiles.
- Consider using brown rice or cauliflower rice to add more nutritional value and reduce carbohydrate content for low-carb diets.
- Prep ingredients in advance by cooking beef and rice earlier to streamline the assembly process and make meal preparation faster and more convenient.
- Prep Time: 10 minutes
- Cook Time: 20 minutes
- Category: Lunch, Dinner, Snacks
- Method: Sautéing
- Cuisine: Mexican
Nutrition
- Serving Size: 4
- Calories: 540
- Sugar: 2g
- Sodium: 1000mg
- Fat: 24g
- Saturated Fat: 10g
- Unsaturated Fat: 12g
- Trans Fat: 0g
- Carbohydrates: 59g
- Fiber: 3g
- Protein: 26g
- Cholesterol: 70mg
Dave Mitchell
Founder & Chief Recipe Developer
Expertise
Education
Asheville-Buncombe Technical Community College
Associate of Applied Science in Culinary Arts
Focus: Comprehensive training in culinary techniques, kitchen management, and menu planning, with a special emphasis on grilling and outdoor cooking.
Dave Mitchell is the heart behind Daves Grill, a cook, writer, and lover of all things grilled. He studied Culinary Arts at Asheville-Buncombe Technical Community College and spent years cooking, testing, and sharing recipes that actually work.
Dave started Daves Grill to keep things simple: one great recipe at a time. His food is bold, easy to follow, and made for real people with regular kitchens. From juicy steaks to quick sides, Dave’s recipes bring the heat without the hassle.