
Heavenly Lemon Marbled Cheesecake Bars Recipe – Slice of Bliss!
Decadent and silky, these lemon marbled cheesecake bars blend tangy citrus with rich cream cheese in a mesmerizing swirl.
Every bite promises a delightful dance of zesty and sweet flavors that will captivate dessert enthusiasts.
The marbling technique creates a stunning visual pattern that makes these bars as beautiful as they are delicious.
Soft cream cheese mingles with bright lemon, creating a harmonious contrast that elevates this classic dessert.
Smooth and creamy textures meld perfectly in each luscious square.
Simple ingredients come together to craft an extraordinary treat that looks far more complicated than its straightforward preparation.
Prepare to wow everyone at your next gathering with these irresistible cheesecake bars that are sure to become a new favorite.
Quick Recipe Overview

Ingredients for Elegant Lemon Marbled Cheesecake Bars
For Crust:For Cheesecake Filling:For Marbling and Topping:Bakeware Essentials for Lemon Marbled Cheesecake Bars
How to Make Lemon Marbled Cheesecake Bars Look Stunning

Crank your oven to a cozy 325F and grab a baking pan. Line it with parchment paper, letting the edges hang over like a soft blanket for easy lifting later.
Mix graham cracker crumbs with melted butter until they stick together like best friends. Press this mixture firmly into the pan, creating a smooth, even foundation. Bake for about 8 minutes until golden and let it chill out.
Grab your mixer and beat cream cheese until it’s silky smooth. Add eggs one by one, stirring in vanilla and sour cream. Keep the mixture light and airy without overdoing the mixing.
Pour the dreamy cheesecake batter over the cooled crust. Drop little spots of lemon curd across the surface. Take a toothpick and gently dance it through the layers, creating beautiful swirls that look like artistic waves.
Slide the pan into the oven and bake for 30-35 minutes. You’ll know it’s ready when the edges look firm but the center still has a gentle wobble.
Let the cheesecake cool completely at room temperature. Then park it in the refrigerator for at least two hours to firm up and develop its rich flavor.
Lift the bars out using the parchment paper. Slice into elegant squares and sprinkle with a whisper of powdered sugar or fresh lemon zest if you’re feeling fancy.
Bright Ideas to Elevate Lemon Marbled Cheesecake Bars
Serving Tips for Elegant Cheesecake Bars
Store Lemon Cheesecake Bars for Sweet Moments Later
FAQs
Yes, simply substitute the graham cracker crumbs with gluten-free graham crackers or crushed gluten-free cookies like almond or coconut flour-based cookies.
Use room temperature ingredients, avoid overmixing the batter, and bake in a water bath or with a pan of water on the bottom rack to create a moist baking environment.
Look for slightly set edges and a center that’s still a bit jiggly. The bars will continue to set while cooling and chilling in the refrigerator.
Absolutely! Homemade lemon curd uses eggs, sugar, lemon juice, lemon zest, and butter. It’s easy to make and provides a fresher, more vibrant flavor than store-bought versions.
Print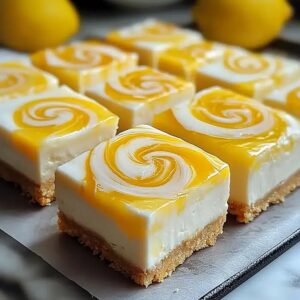
Dreamy Lemon Marbled Cheesecake Bars
- Total Time: 55 minutes
- Yield: 17 1x
Description
Lemon marbled cheesecake bars dance with zesty citrus notes through creamy swirled layers. Silky textures and balanced sweetness invite simple pleasure, beckoning you to savor each luxurious bite.
Ingredients
- 16 oz (450 g) cream cheese, softened
- 2 large eggs
- ½ cup (120 ml) lemon curd, store-bought or homemade
- 1 ½ cups (180 g) graham cracker crumbs
- ¾ cup (150 g) granulated sugar
- ¼ cup (50 g) granulated sugar
- ¼ cup (60 ml) sour cream
- ½ cup (115 g) unsalted butter, melted
- 1 tsp vanilla extract
- 1 tsp lemon zest (optional, for extra zing)
Instructions
- Craft Base: Pulverize graham crackers and merge with melted butter and sugar. Press the mixture uniformly into a lined baking pan, creating a compact foundation. Bake at 350°F for 8-10 minutes until golden, establishing a crisp, sturdy platform for the cheesecake.
- Prepare Cream Cheese Filling: Whisk cream cheese until velvety smooth. Introduce eggs systematically, blending thoroughly after each addition. Gently incorporate vanilla and sour cream, maintaining a luxurious, silken consistency without overmixing.
- Create Marbled Effect: Pour cream cheese mixture over the graham cracker base. Drizzle lemon curd across the surface in graceful, zigzag patterns. Use a toothpick to weave intricate swirls, integrating the citrus essence through the creamy landscape without disrupting the underlying structure.
- Bake and Set: Transfer to a preheated 325°F oven. Bake for 35-40 minutes, monitoring until edges become firm and center maintains a subtle tremor. The ideal texture should resemble a delicate custard – set yet slightly jiggly in the center.
- Chill and Finalize: Allow the cheesecake to cool completely at room temperature, then refrigerate for minimum 4 hours. This resting period allows flavors to harmonize and texture to stabilize, transforming the dessert into a cohesive, refined delicacy.
- Serve with Elegance: Remove from pan using parchment paper handles. Slice into precise bars with a knife warmed under hot water. Dust with powdered sugar or garnish with fresh lemon zest for a sophisticated presentation that elevates the visual appeal.
Notes
- Achieve Smooth Cream Cheese: Ensure cream cheese is at room temperature and beat until completely smooth to prevent lumps and create a silky texture.
- Master the Marbling Technique: Drizzle lemon curd sparingly and use a toothpick or skewer with light, swift movements to create delicate swirls without overmixing.
- Prevent Cheesecake Cracking: Bake in a water bath or place a pan of hot water on the bottom rack to create moisture and prevent surface cracks during baking.
- Perfect Cutting Method: Wipe the knife with hot water between each cut and clean the blade to ensure crisp, clean slices that showcase the beautiful marbled pattern.
- Prep Time: 20 minutes
- Cook Time: 35 minutes
- Category: Desserts
- Method: Baking
- Cuisine: American
Nutrition
- Serving Size: 17
- Calories: 284
- Sugar: 18 g
- Sodium: 226 mg
- Fat: 19 g
- Saturated Fat: 11 g
- Unsaturated Fat: 8 g
- Trans Fat: 0 g
- Carbohydrates: 29 g
- Fiber: 1 g
- Protein: 4 g
- Cholesterol: 79 mg
Emily Lawson
Content Creator & Culinary Specialist
Expertise
Education
Oregon Culinary Institute
Diploma in Culinary Arts
Focus: Emphasis on farm-to-table cooking, sustainable practices, and the fusion of global flavors with traditional grilling methods.
Emily Lawson is the content creator at Daves Grill, turning tasty ideas into clear, easy recipes. Based in Portland, she trained at the Oregon Culinary Institute and loves cooking with fresh, seasonal ingredients, especially grilled veggies and global flavors.
Emily mixes food writing with hands-on cooking to bring you recipes that feel fun, not stressful. Her goal is to make every dish simple, flavorful, and worth coming back to. Together, she and Dave serve up real food, one recipe at a time.