
Sizzling Explosive Garlic Parmesan Cheeseburger Bombs Recipe
The ultimate comfort food meets gourmet adventure with these garlic parmesan cheeseburger bombs that redefine classic burger expectations.
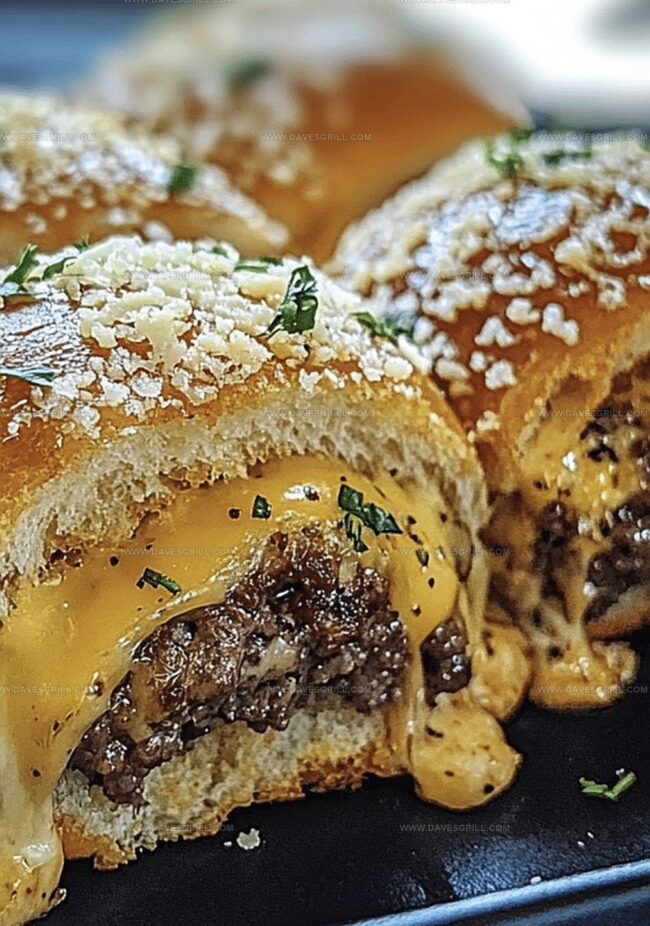
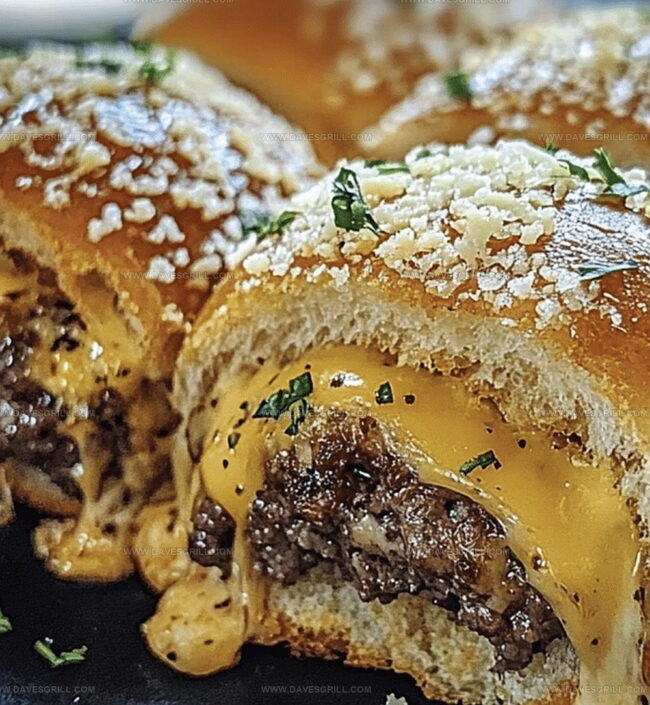
Packed with melted cheese and savory ground beef, these delectable bites burst with flavor in every single mouthful.
The crispy exterior gives way to a molten center that screams indulgence and pure satisfaction.
Each bomb combines the rich, umami notes of garlic with the sharp, salty punch of parmesan cheese.
Perfectly seasoned meat nestles inside a golden-brown shell, creating a handheld treat that’s impossible to resist.
Home cooks and burger enthusiasts will fall in love with this creative twist on a beloved classic.
Prepare to elevate your appetizer game and watch these irresistible bombs disappear from the plate in seconds.
Quick Recipe Overview
Cheeseburger Bomb Ingredient List
For Meat And Seasonings:For Dough And Cheese:For Topping And Finishing:Tools to Make Cheesy Bombs with Garlic Flavor
How to Bake Cheeseburger Bombs to Gooey Goodness
Crank your oven to a toasty 375 degrees and prep a baking sheet with a quick spray or parchment paper swipe.
Sizzle ground beef in a skillet, breaking it down into tiny crumbles. Once cooked, drain extra grease and jazz it up with Worcestershire sauce, garlic powder, and seasonings. Set aside to cool slightly.
Gently stretch out each refrigerated biscuit into a soft, round canvas. Don’t worry about making them perfect.
Drop a hearty spoonful of seasoned beef into the center of each biscuit. Crown it with a generous sprinkle of cheddar cheese. Carefully fold and pinch the edges closed, creating little flavor-packed pouches.
Arrange these tasty bundles on your prepared baking sheet. Slide into the oven and bake for 12-15 minutes until they turn a gorgeous golden brown.
Whip up a quick topping by mixing melted butter, minced garlic, and Parmesan cheese. As soon as the bombs emerge from the oven, lovingly brush them with this aromatic mixture.
Pull these piping hot cheeseburger bombs straight from the oven and watch everyone dive in. Perfect for dipping or enjoying solo!
Tips That Pack More Flavor Per Bite
Serve Them Warm with a Dipping Sauce
Store Leftovers for Reheats Later
FAQs
Yes, ground turkey is a great lean alternative. Just make sure to season it well and cook it thoroughly to maintain flavor and moisture.
While fresh minced garlic provides the best flavor, you can use dried garlic powder if that’s what you have on hand. Just adjust the quantity to taste.
You can assemble the bombs and refrigerate them for a few hours before baking. Just add a few extra minutes to the baking time to ensure they’re heated through completely.
Refrigerated buttermilk biscuit dough is ideal. Avoid using flaky or layered biscuit dough as it might not seal as well around the filling.
Print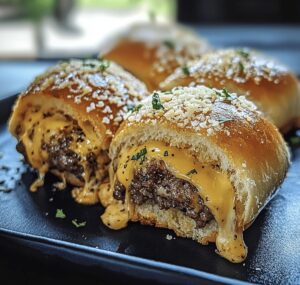
Explosive Garlic Parmesan Cheeseburger Bombs
- Total Time: 35 minutes
- Yield: 13 1x
Description
Savory Garlic Parmesan Cheeseburger Bombs merge classic burger flavors with irresistible stuffed pastry technique. Melted cheese and seasoned ground beef create a delightful handheld treat we eagerly devour.
Ingredients
- 1 lb (450 g) ground beef
- 12 small cubes cheddar cheese or mozzarella
- 1 small onion, finely diced
- 2 cloves garlic, minced
- 1 tbsp ketchup
- 1 tsp mustard
- Salt and black pepper, to taste
- 1 (16 oz / 450 g) can refrigerated biscuit dough
- ¼ cup (60 g) unsalted butter, melted
- 2 cloves garlic, minced
- 2 tbsps grated Parmesan cheese
- 1 tsp dried parsley
Instructions
- Preparation: Heat oven to 375F (190C). Line baking sheet with parchment paper or lightly grease to prevent sticking.
- Meat Mixture: In skillet, brown ground beef over medium heat, crumbling with spatula. Drain excess fat. Season with Worcestershire sauce, garlic powder, onion powder, salt, and pepper. Remove from heat.
- Dough Transformation: Gently stretch refrigerated biscuit dough into wider, thinner circles using fingertips.
- Filling Assembly: Center a portion of seasoned meat on each dough circle. Top with cheddar cheese. Carefully fold and seal dough edges, ensuring complete closure without openings.
- Baking Process: Position sealed parcels on prepared baking sheet with adequate spacing. Roast for 12-15 minutes until surfaces turn golden brown and dough cooks thoroughly.
- Finishing Touch: Whisk melted butter with minced garlic and Parmesan cheese. Brush aromatic mixture over freshly baked bombs immediately after removing from oven.
- Serving: Plate cheeseburger bombs hot, optionally accompanied by dipping sauces for enhanced flavor experience.
Notes
- Seal Carefully: Ensure dough edges are completely sealed to prevent cheese leakage during baking, using pinching techniques to close any potential openings.
- Meat Moisture Control: Drain ground beef thoroughly to avoid soggy dough and prevent excess grease from making the bombs heavy or greasy.
- Dough Stretching Technique: Gently stretch biscuit dough with fingertips, creating a thin, even surface that allows easier wrapping and more uniform cooking.
- Brush Generously: Apply garlic Parmesan butter immediately after baking for maximum flavor absorption and a glossy, appetizing appearance.
- Prep Time: 15 minutes
- Cook Time: 20 minutes
- Category: Lunch, Dinner, Appetizer, Snacks
- Method: Baking
- Cuisine: American
Nutrition
- Serving Size: 13
- Calories: 260
- Sugar: 1 g
- Sodium: 620 mg
- Fat: 17 g
- Saturated Fat: 8 g
- Unsaturated Fat: 9 g
- Trans Fat: 0 g
- Carbohydrates: 18 g
- Fiber: 1 g
- Protein: 10 g
- Cholesterol: 40 mg
Emily Lawson
Content Creator & Culinary Specialist
Expertise
Education
Oregon Culinary Institute
Diploma in Culinary Arts
Focus: Emphasis on farm-to-table cooking, sustainable practices, and the fusion of global flavors with traditional grilling methods.
Emily Lawson is the content creator at Daves Grill, turning tasty ideas into clear, easy recipes. Based in Portland, she trained at the Oregon Culinary Institute and loves cooking with fresh, seasonal ingredients, especially grilled veggies and global flavors.
Emily mixes food writing with hands-on cooking to bring you recipes that feel fun, not stressful. Her goal is to make every dish simple, flavorful, and worth coming back to. Together, she and Dave serve up real food, one recipe at a time.