
Jolly Holiday Festive Snowball Cookies Recipe for Winter Joy
Winter’s charm sparkles through these melt-in-your-mouth festive snowball cookies that dance with powdered sugar elegance.
Holiday baking reaches peak perfection with this classic treat that delights every gathering.
Buttery and delicate, these round cookies crumble softly with each delectable bite.
Generations have cherished this simple yet magical recipe passed down through kitchens.
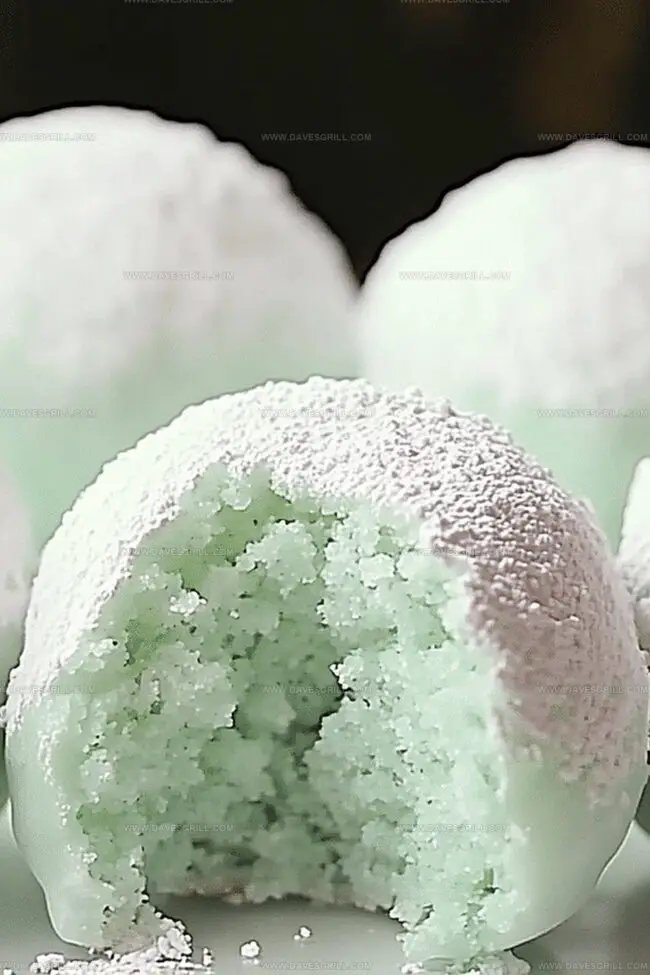
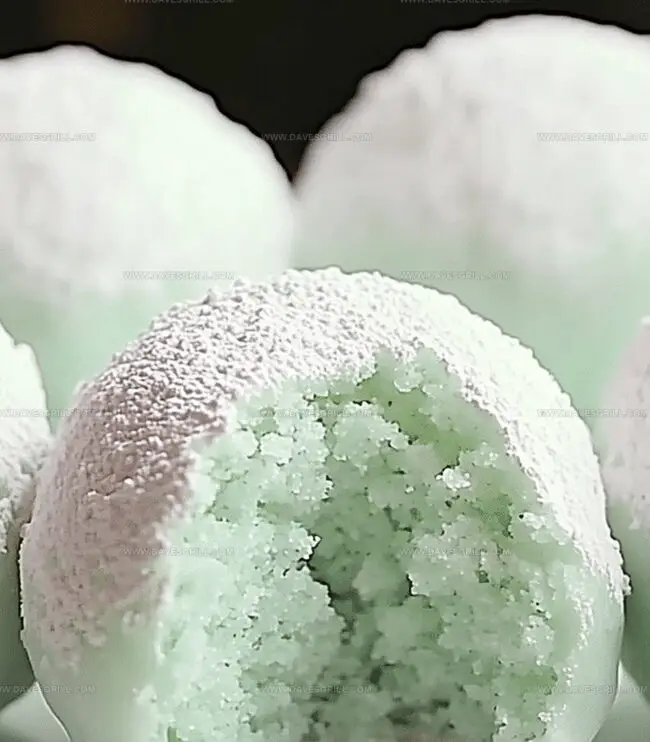
Rich with pecans and dusted generously with confectioners’ sugar, these cookies bring warmth to cold winter evenings.
Crafted with love and minimal ingredients, they promise to become your new seasonal favorite.
Let the sweet memories begin with these irresistible snowball cookies that celebrate winter’s delightful spirit.
Quick Recipe Overview
Snowball Cookie Ingredients to Stock Up On
For Creamy Base:For Flavor Enhancers:For Structure and Texture:For Finishing Touch:Bakeware for Minty Snowball Cookies
Bake Snowball Cookies with That Melty Center
Grab a mixing bowl and blend softened butter with powdered sugar until it becomes super fluffy and creamy. Splash in some vanilla and peppermint extracts for thatal wintery flavor. Gently fold in flour and mix until everything comes together smoothly.
Using your hands, roll the dough into adorable bite-sized spheres. Don’t worry about making them perfectly round – rustic is charming! Place these little gems onto a parchment-lined baking sheet, giving them a little breathing room.
Pop the cookie sheet into a preheated oven at 350F. Watch carefully as they transform from soft dough to delicate treats. They’re done when they look set but haven’t turned golden brown – about 10-12 minutes.
While the cookies are still warm, gently roll them in powdered sugar. This is where the happens! For extra festivity, mix in some green or red sanding sugar. Once they’ve cooled slightly, give them another luxurious sugar bath for that beautiful snowball effect.
Tuck these delightful treats into an airtight container. They’ll stay fresh and delicious for about a week – if they last that long!
Tips for Getting the Right Minty Finish
Serve Snowballs with a Dusting of Cheer
Store Minty Cookies Without Losing Texture
FAQs
These cookies get their name from their round shape and powdery white coating that resembles small snowballs, similar to traditional Mexican wedding cookies or Russian tea cakes.
Yes, you can substitute the peppermint extract with almond extract or vanilla extract for a different flavor profile while maintaining the cookie’s soft texture.
Keep the dough chilled before shaping and ensure your butter is at the right temperature – softened but not melted. This helps maintain the cookie’s compact, round shape during baking.
While mini chocolate chips add nice texture and flavor, they are optional. You can omit them or replace with chopped nuts like pecans or almonds if you prefer.
Print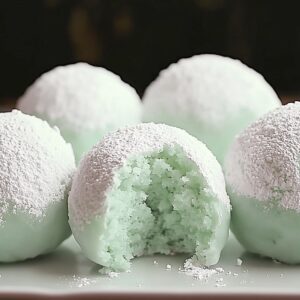
Festive Snowball Cookies Recipe
- Total Time: 27 minutes
- Yield: 25 1x
Description
Holiday cookie enthusiasts will adore these Minty Snowball Cookies, a festive treat blending cool peppermint with buttery shortbread. Delicate powdered sugar coating and refreshing mint flavor make these cookies a delightful winter dessert you’ll savor with each bite.
Ingredients
- 2 cups (480 ml) all-purpose flour
- 1 cup (227 g) unsalted butter, softened
- ¾ cup (135 g) mini chocolate chips or finely chopped dark chocolate
- ½ cup (60 g) powdered sugar (plus extra for coating)
- 1 tsp vanilla extract
- ½ tsp peppermint extract
- ¼ tsp salt
- Green or red sanding sugar (optional, for a festive touch)
Instructions
- Preparation: Gather mixing bowl, parchment-lined baking sheet, measuring tools, and electric mixer for efficient cookie crafting.
- Creaming: Whip butter and powdered sugar until transformed into a pale, fluffy mixture, creating a silky foundation for the dough.
- Flavor Infusion: Blend vanilla and peppermint extracts thoroughly, ensuring aromatic essence permeates the entire mixture.
- Dough Formation: Integrate flour and salt, gently folding until a cohesive dough emerges, avoiding excessive mixing that could compromise texture.
- Chocolate Integration: Fold mini chocolate chips throughout the dough, guaranteeing a consistent chocolate experience in each morsel.
- Oven Preparation: Heat oven to 350F (175C), allowing complete temperature stabilization before baking commences.
- Cookie Shaping: Craft uniform 1-inch spheres with gentle, consistent pressure, maintaining smooth, symmetric cookie shapes.
- Baking Process: Arrange cookie balls on prepared sheet, maintaining slight separation to prevent merging during baking.
- Baking and Cooling: Bake 10-12 minutes until set but not browned, then rest for 5 minutes to stabilize structure.
- First Sugar Coating: While warm, delicately roll cookies in powdered sugar, creating an initial light dusting.
- Optional Decoration: Optionally incorporate green or red sanding sugar for festive visual appeal.
- Final Sugar Coating: After complete cooling, execute a second powdered sugar roll for a luxurious, snow-like finish.
- Storage: Preserve cookies in an airtight container, maintaining freshness for up to one week at room temperature.
Notes
Customize Texture Carefully: Avoid overmixing dough to prevent dense, tough cookies; mix ingredients just until combined for a light, crumbly texture.
Manage Mint Intensity: Adjust peppermint extract quantity based on personal preference; start with less and gradually increase for balanced flavor without overwhelming mintiness.
Achieve Perfect Shape: Use consistent, gentle pressure when forming cookie balls to ensure uniform size and smooth exterior, which helps cookies bake evenly and look professional.
Temperature Control Matters: Allow cookies to cool slightly before first powdered sugar coating to help sugar adhere better and create a smooth, even layer without clumping.
- Prep Time: 15 minutes
- Cook Time: 12 minutes
- Category: Desserts, Snacks
- Method: Baking
- Cuisine: American
Nutrition
- Serving Size: 25
- Calories: 150
- Sugar: 3 g
- Sodium: 50 mg
- Fat: 10 g
- Saturated Fat: 6 g
- Unsaturated Fat: 4 g
- Trans Fat: 0 g
- Carbohydrates: 15 g
- Fiber: 0 g
- Protein: 2 g
- Cholesterol: 30 mg
Emily Lawson
Content Creator & Culinary Specialist
Expertise
Education
Oregon Culinary Institute
Diploma in Culinary Arts
Focus: Emphasis on farm-to-table cooking, sustainable practices, and the fusion of global flavors with traditional grilling methods.
Emily Lawson is the content creator at Daves Grill, turning tasty ideas into clear, easy recipes. Based in Portland, she trained at the Oregon Culinary Institute and loves cooking with fresh, seasonal ingredients, especially grilled veggies and global flavors.
Emily mixes food writing with hands-on cooking to bring you recipes that feel fun, not stressful. Her goal is to make every dish simple, flavorful, and worth coming back to. Together, she and Dave serve up real food, one recipe at a time.