
Blissful Chocolate Thumbprint Cookies Recipe: Sweet Joy in Every Bite
Warm chocolate thumbprint cookies melt hearts faster than butter on a hot skillet.
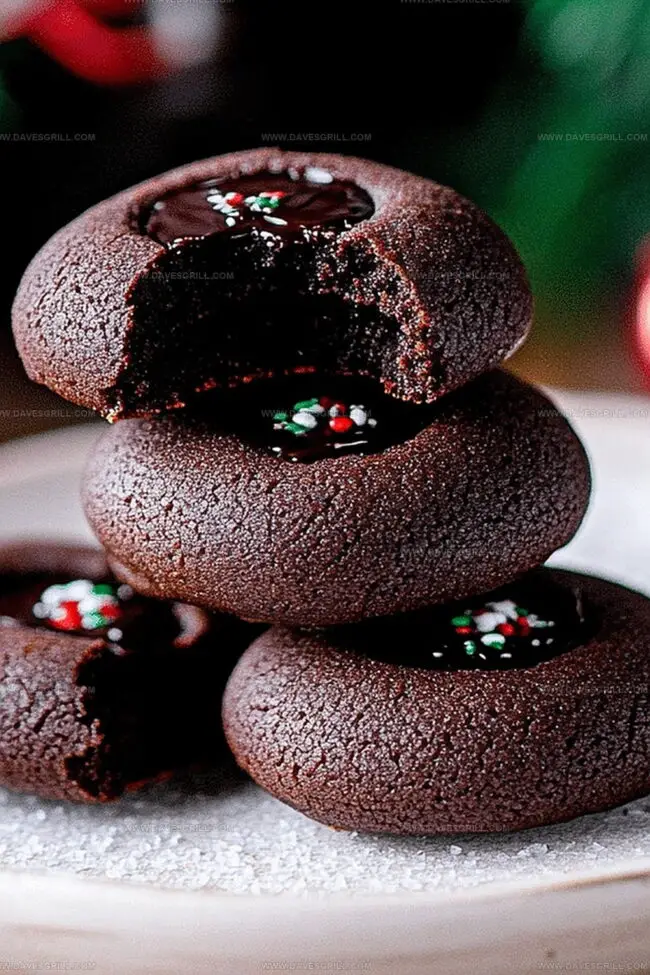
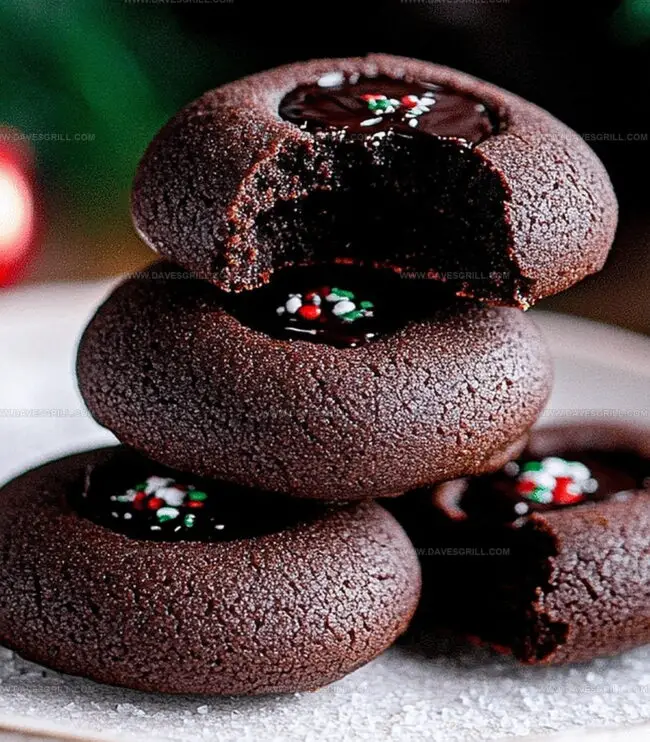
These decadent treats blend rich cocoa with creamy chocolate centers that dance across your taste buds.
Every bite of these chocolate thumbprint cookies promises pure indulgence and comfort.
The delicate indentation filled with silky ganache creates a perfect balance of textures and flavors.
Bakers of all skill levels can master this simple yet elegant dessert.
Sweet aromas will fill your kitchen, drawing everyone near with anticipation.
Prepare to savor a classic cookie that turns an ordinary moment into something extraordinary.
Quick Recipe Overview
Chocolate Thumbprint Cookie Ingredient Highlights
For Dough Base:For Coating and Texture:For Chocolate Filling:Tools to Shape and Fill Chocolate Thumbprint Cookies
Bake Chocolate Thumbprints with Gooey Centers
Grab softened butter and sugar, then whip them together until super creamy and light. Add egg yolks and vanilla, blending smoothly. Gradually mix in flour and salt to create a soft, silky dough. Pop the dough in the refrigerator for a quick 30-minute chill.
Warm up the oven to 350F and line a baking sheet with parchment. Roll dough into cute little balls about an inch wide. Want extra crunch? Roll them in chopped nuts for a delicious twist. Space the balls generously on the baking sheet.
Press your thumb or a spoon’s back gently into each cookie’s center, making a sweet little pocket for chocolate goodness.
Slide the cookies into the oven and bake 10-12 minutes until edges turn a delicate golden brown. Let them rest briefly on the baking sheet, then nudge the centers down if they’ve puffed up. Transfer to a cooling rack.
Melt chocolate chips with cream and butter in short microwave bursts, stirring until silky smooth. Spoon the luscious chocolate into each cookie’s center. Allow chocolate to set naturally or speed things up in the refrigerator.
Flavor Ideas for Filling Thumbprint Cookies
Serve Chocolate Thumbprints on Dessert Trays
Store Thumbprint Cookies to Keep Them Tender
FAQs
The recipe works best with unsalted butter to control the salt content. If using salted butter, reduce or eliminate any additional salt in the recipe.
Chilling the dough is crucial. Make sure to refrigerate the dough for at least 30 minutes before shaping and baking. This helps the cookies maintain their shape and prevents excessive spreading.
Gently press down the indentation again while the cookies are still warm, right after removing them from the oven. This helps maintain the classic thumbprint shape.
Yes, you can prepare the dough in advance and refrigerate it for up to 2-3 days before baking. The unbaked dough can also be frozen for up to a month, making it easy to have fresh cookies on demand.
Print
Heavenly Chocolate Thumbprint Cookies Recipe
- Total Time: 32 minutes
- Yield: 13 1x
Description
Homemade chocolate thumbprint cookies blend rich cocoa with sweet raspberry jam in a delightful treat. Swiss chocolate and European baking techniques elevate this classic dessert for cookie enthusiasts.
Ingredients
- 1 ¼ cups (156 g) all-purpose flour
- ½ cup (50 g) unsweetened cocoa powder
- ½ cup (113 g) unsalted butter
- ⅔ cup (133 g) granulated sugar
- 1 large egg
- 1 tsp vanilla extract
- ½ tsp salt
- 4 oz (113 g) semisweet chocolate
- ¼ cup (60 ml) heavy cream
- 2 tbsps (28 g) unsalted butter
- powdered sugar (optional)
Instructions
- Prepare Dough: Cream butter and sugar until light and fluffy. Mix in egg yolks and vanilla until fully incorporated, then gently fold in flour and salt to create a soft dough. Wrap and chill for 30 minutes to firm up.
- Shape Cookies: Preheat oven to 350F (175C). Roll chilled dough into uniform spheres. Optional: Roll cookies in finely chopped nuts for added texture. Place on parchment-lined baking sheet, spacing them 2 inches apart.
- Create Indentations: Press a thumb or rounded tool into the center of each cookie, forming a deep well. The indentation should be wide enough to hold chocolate filling.
- Bake and Modify: Bake for 10-12 minutes until edges turn golden. Immediately upon removal, gently redefine the indentations if they’ve flattened. Transfer to a cooling rack.
- Craft Chocolate Filling: Melt chocolate chips with heavy cream and butter using short microwave intervals, stirring between each to achieve a smooth, glossy ganache.
- Final Touch: While cookies are slightly warm, fill the centers with the molten chocolate mixture. Allow chocolate to set at room temperature or expedite by chilling in the refrigerator.
Notes
Optimize Butter Whipping: Ensure butter is at room temperature for maximum aeration, creating a lighter, fluffier cookie base that guarantees tender texture.
Control Dough Chilling: Refrigerate dough for exactly 30 minutes – not longer – to prevent excessive hardening and maintain optimal cookie consistency.
Perfect Thumb Technique: Use the back of a small measuring spoon instead of your thumb to create uniform, precise indentations without potential inconsistencies.
Chocolate Filling Precision: Allow chocolate mixture to cool slightly before filling to prevent cookie base from melting and maintain clean, attractive presentation.
- Prep Time: 20 minutes
- Cook Time: 12 minutes
- Category: Desserts, Snacks
- Method: Baking
- Cuisine: American
Nutrition
- Serving Size: 13
- Calories: 152
- Sugar: 10 g
- Sodium: 80 mg
- Fat: 9 g
- Saturated Fat: 5 g
- Unsaturated Fat: 4 g
- Trans Fat: 0 g
- Carbohydrates: 17 g
- Fiber: 1 g
- Protein: 2 g
- Cholesterol: 15 mg
Emily Lawson
Content Creator & Culinary Specialist
Expertise
Education
Oregon Culinary Institute
Diploma in Culinary Arts
Focus: Emphasis on farm-to-table cooking, sustainable practices, and the fusion of global flavors with traditional grilling methods.
Emily Lawson is the content creator at Daves Grill, turning tasty ideas into clear, easy recipes. Based in Portland, she trained at the Oregon Culinary Institute and loves cooking with fresh, seasonal ingredients, especially grilled veggies and global flavors.
Emily mixes food writing with hands-on cooking to bring you recipes that feel fun, not stressful. Her goal is to make every dish simple, flavorful, and worth coming back to. Together, she and Dave serve up real food, one recipe at a time.