Dreamy Mounds Poke Cake Recipe: Chocolatey Coconut Bliss
Chocolate lovers adore this dreamy mounds poke cake that blends rich coconut and decadent chocolate in every delightful bite.
My kitchen often buzzes with excitement when I’m preparing this irresistible dessert.
Sweet memories of tropical flavors dance through each creamy slice.
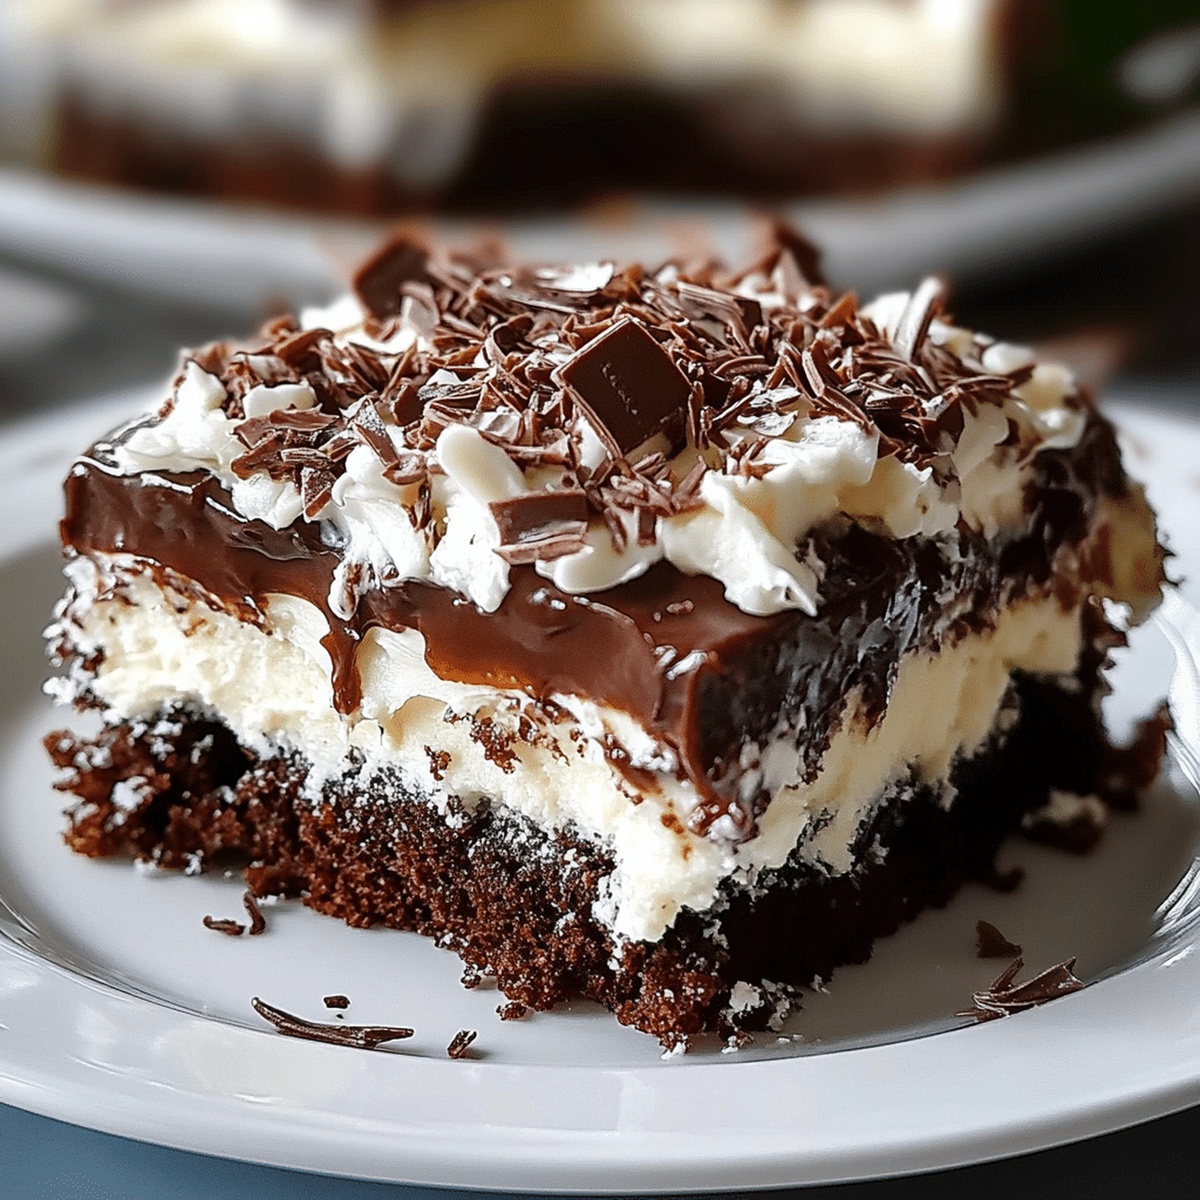
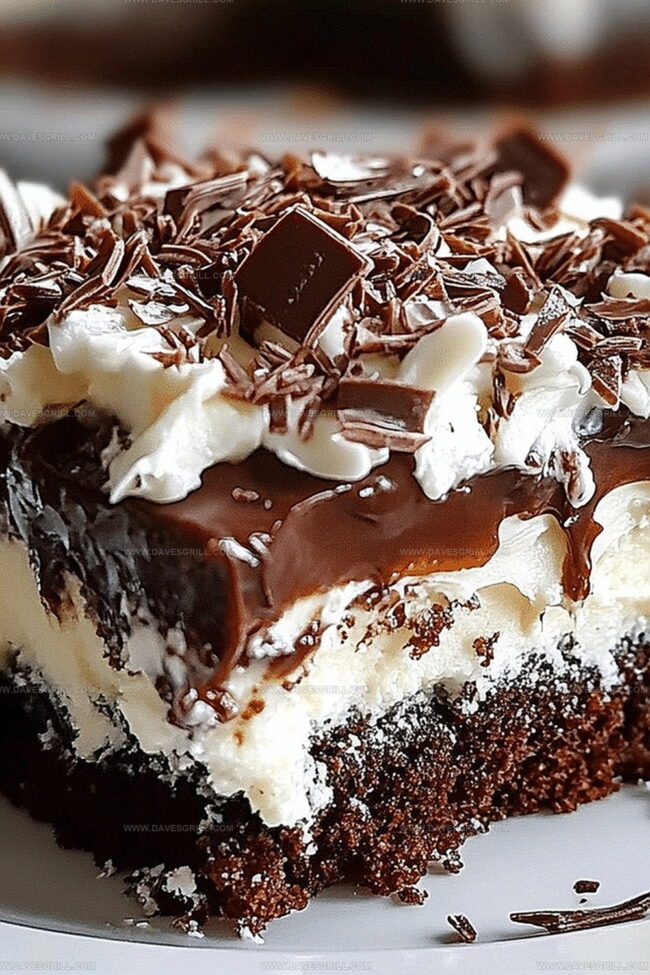
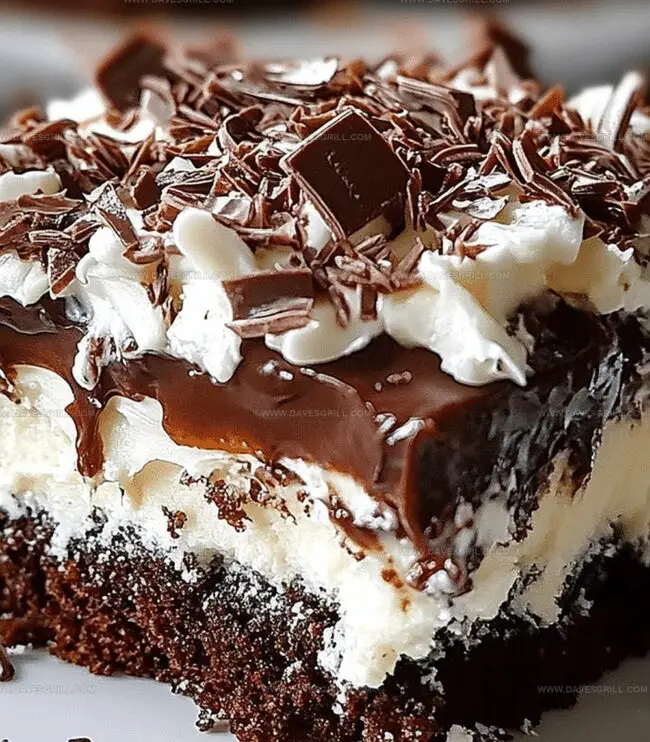
Layers of moist chocolate cake get infused with silky coconut cream, creating a magical texture that melts in you.
Condensed milk and chocolate drizzles weave through the cake’s tender crumb like delicate ribbons of pure indulgence.
Each forkful promises a tropical escape without leaving your dining room.
Dive into this simple yet spectacular treat that will make everyone at the table ask for seconds.
Reasons Mounds Poke Cake Gets Requested Often
Everything You’ll Need for Mounds Poke Cake
Cake Base:Coconut Filling:Chocolate Topping:Straightforward Mounds Poke Cake Instructions
Step 1: Create Chocolate Base
Whip up the chocolate cake mix following package instructions. Pour the silky batter into a greased 9×13-inch pan. Slide into a preheated oven and bake until a toothpick comes out clean, usually around 30 minutes.
Step 2: Craft Coconut Mixture
Combine in a saucepan:Warm over low heat, stirring gently until ingredients blend smoothly. Remove from stove and let cool slightly.
Step 3: Transform Cake Surface
Grab a wooden spoon handle or straw. Poke holes generously across the entire cake surface. Ensure holes are deep enough for filling but not so aggressive that cake crumbles.
Step 4: Infuse with Coconut Goodness
Drench the cake with coconut mixture, ensuring every hole gets saturated. Allow 10-15 minutes for liquid to completely absorb, creating a lusciously moist texture.
Step 5: Develop Chocolate Topping
Heat heavy cream in microwave until just simmering. Drop chocolate chips into warm cream. Let sit momentarily, then stir until achieving a glossy, smooth consistency.
Step 6: Decorate with Flair
Cascade chocolate topping over cake. Sprinkle generously with:Step 7: Chill and Indulge
Refrigerate cake for minimum 2 hours. This allows flavors to mingle and intensify. Slice, serve, and savor each decadent bite of this tropical-inspired dessert.
Handy Tricks for Mounds Poke Cake Bakers
Best Way to Store Mounds Poke Cake
Side Suggestions for Mounds Poke Cake
Fresh Spins on Mounds Poke Cake
Print
Mounds Poke Cake Recipe
- Total Time: 45 minutes
- Yield: 15 1x
Description
Chocolate lovers rejoice with this mounds poke cake, a dreamy dessert infused with coconut and rich chocolate flavors. Each slice promises a delightful journey through creamy layers that melt effortlessly on your palate, inviting pure indulgence.
Ingredients
Cake Base:
- 1 box chocolate cake mix
- 3 eggs (as per box instructions)
- ⅓ cup vegetable oil (as per box instructions)
- 1 cup water (as per box instructions)
Coconut Filling:
- 1 can (14 ounces / 397 grams) sweetened condensed milk
- 1 cup cream of coconut (such as Coco Lopez)
Topping and Garnish:
- 1 container (8 ounces / 226 grams) whipped topping (like Cool Whip), thawed
- 1 cup sweetened shredded coconut
- ½ cup chocolate syrup or chocolate ganache (optional, for drizzling)
Instructions
- Prepare the chocolate cake mix meticulously following package instructions, ensuring a smooth, well-combined batter.
- Transfer the batter into a greased 9×13-inch baking pan and bake in a preheated oven until a toothpick inserted comes out clean.
- During baking, craft the coconut filling by gently warming sweetened condensed milk with shredded coconut and vanilla extract in a saucepan, stirring until harmoniously blended.
- After the cake cools slightly, create strategic perforations across the surface using a wooden spoon handle or straw, allowing deep but controlled penetration.
- Cascade the warm coconut filling over the cake, guaranteeing complete saturation through each carefully crafted hole.
- Allow the cake to rest briefly, permitting the filling to deeply penetrate and enhance moisture levels.
- Craft the chocolate topping by heating heavy cream until it reaches a gentle simmer, then incorporate chocolate chips, stirring until achieving a luxurious, glossy consistency.
- Generously drape the molten chocolate mixture across the cake’s surface, ensuring comprehensive coverage.
- Embellish the cake with a scattering of mini chocolate chips and additional shredded coconut for textural complexity.
- Refrigerate the dessert for a minimum of two hours, enabling flavors to harmonize and intensify.
- Serve chilled, revealing a decadent, multi-layered confection that promises an extraordinary sensory experience.
Notes
- Ensure cake mix is thoroughly mixed to avoid lumps and create a smooth, even texture.
- Allow cake to cool slightly before poking holes to prevent the cake from falling apart or becoming mushy.
- Use a chopstick or handle of a wooden spoon for precise, evenly spaced holes throughout the cake.
- Choose full-fat sweetened condensed milk for maximum richness and a more decadent coconut filling.
- Microwave chocolate chips in short bursts to prevent burning and maintain a glossy chocolate topping.
- For a lighter version, substitute whole milk with coconut milk and use dark chocolate with lower sugar content.
- Enhance flavor by toasting coconut flakes before adding them to the topping for a deeper, nuttier taste.
- Make the cake ahead of time and store in the refrigerator for up to 3 days for convenient entertaining.
- Prep Time: 15 minutes
- Cook Time: 30 minutes
- Category: Desserts
- Method: Baking
- Cuisine: American
Nutrition
- Serving Size: 15
- Calories: 337
- Sugar: 30 g
- Sodium: 200 mg
- Fat: 12 g
- Saturated Fat: 8 g
- Unsaturated Fat: 4 g
- Trans Fat: 0 g
- Carbohydrates: 53 g
- Fiber: 1 g
- Protein: 3 g
- Cholesterol: 25 mg
Dave Mitchell
Founder & Chief Recipe Developer
Expertise
Education
Asheville-Buncombe Technical Community College
Associate of Applied Science in Culinary Arts
Focus: Comprehensive training in culinary techniques, kitchen management, and menu planning, with a special emphasis on grilling and outdoor cooking.
Dave Mitchell is the heart behind Daves Grill, a cook, writer, and lover of all things grilled. He studied Culinary Arts at Asheville-Buncombe Technical Community College and spent years cooking, testing, and sharing recipes that actually work.
Dave started Daves Grill to keep things simple: one great recipe at a time. His food is bold, easy to follow, and made for real people with regular kitchens. From juicy steaks to quick sides, Dave’s recipes bring the heat without the hassle.