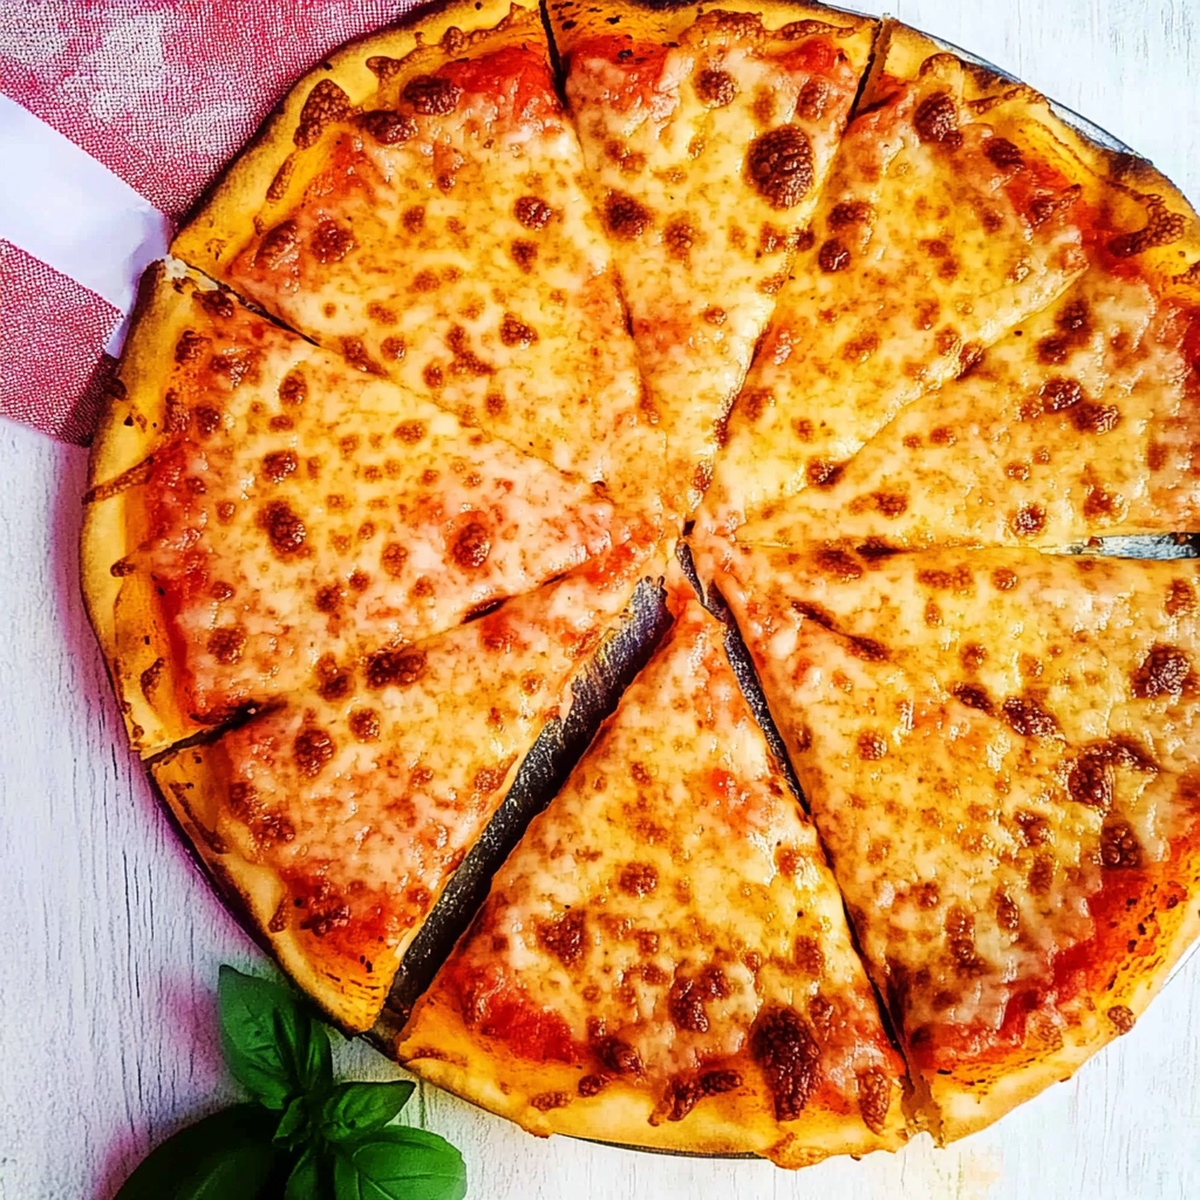
Classic New York Pizza Recipe: Fold-Worthy & Flavor-Packed
Crispy and bold, this new york pizza captures the essence of authentic street-corner charm.
Passionate cooks recognize the magic behind every perfectly crafted slice.
Manhattan’s culinary legacy breathes life into each handmade crust.
Neighborhood pizzerias inspired this straightforward yet remarkable recipe that speaks directly to your inner foodie.
Regional techniques merge with simple ingredients to create something extraordinary.
Cheese, sauce, and dough dance together in a delicious symphony.
You won’t believe how easily restaurant-quality magic emerges from your own kitchen.
Grab a slice and transport yourself to the bustling streets of manhattan!
Why New York Pizza Recipe Is Worth Making
What You’ll Need For New York Pizza Recipe
Pizza Dough Base:Pizza Dry Ingredients:Pizza Liquid Ingredients:Easy Steps For New York Pizza Recipe
Step 1: Mix Dry Ingredients
Grab a spacious mixing bowl and whisk together:Blend these ingredients until they’re perfectly combined and create a uniform dry mixture.
Step 2: Create Pizza Dough Base
Pour in:Stir the liquid ingredients into the dry mixture until a shaggy, rough dough starts to form. Begin kneading the dough either by hand or using a stand mixer with a dough hook. Continue working the dough for 7-10 minutes until it transforms into a smooth, stretchy, and elastic consistency.
Step 3: Rest and Develop Flavor
Divide the dough into two equal portions. Lightly coat two separate bowls with olive oil and place each dough ball into its own bowl. Cover the bowls with plastic wrap or a clean kitchen towel. Transfer the bowls to the refrigerator and let the dough slowly ferment for 12-24 hours. This extended resting period allows complex flavors to develop and improves the dough’s texture.
Step 4: Prepare Dough for Baking
Remove the dough from the refrigerator and let it sit at room temperature for about 1 hour before you plan to make your pizza. This step helps the dough become more pliable and easier to stretch, ensuring a perfect New York-style pizza crust.
Tips To Nail The New York Pizza Recipe
How To Store New York Pizza Recipe Properly
What Tastes Great With New York Pizza Recipe
Fun Variations Of New York Pizza Recipe
All Your New York Pizza Recipe Questions
The key differences are the high-protein bread flour, long cold fermentation, and the specific ratio of ingredients that create the signature thin, crispy, yet chewy crust that New York pizza is famous for.
Absolutely! You can knead the dough manually on a clean surface. Use the heel of your hand to push and fold the dough, rotating it periodically. It might take a bit more effort, but the results will be just as delicious.
The cold fermentation allows the flavors to develop more deeply and helps create a more complex, authentic New York-style pizza taste. This slow resting period also improves the dough’s texture and makes it easier to stretch.
Yes, bread flour is crucial because its higher protein content creates more gluten, which gives the pizza crust its characteristic chewiness and structure that defines a classic New York pizza.
Print
New York Pizza Recipe
- Total Time: 1 hour 10 minutes
- Yield: 2 1x
Description
Savory New York pizza brings authentic Italian-American flavors straight from Manhattan’s bustling streets. Crispy thin crust topped with zesty tomato sauce and melted mozzarella promises a delicious slice of culinary perfection for pizza enthusiasts.
Ingredients
Main Ingredients:
- 3.75 cups (470g) bread flour
- 1.5 cups (315ml) warm water
- 1 (15 ounces) can crushed tomatoes
- 1 to 1.5 cups shredded whole milk mozzarella cheese
Dough and Base Ingredients:
- 1.5 teaspoons salt
- 1 teaspoon sugar
- 1 teaspoon instant yeast
- 1 tablespoon olive oil
Seasoning and Flavor Ingredients:
- 1 clove garlic, minced
- 0.5 teaspoon dried oregano
- 0.5 teaspoon dried basil
- Salt and pepper, to taste
- 1 pinch of sugar (optional)
- Olive oil (for brushing crust)
Optional Toppings:
- Red pepper flakes
- Grated Parmesan
- Fresh basil
Instructions
- Combine dry ingredients in a spacious mixing vessel, whisking flour, salt, granulated sweetener, and leavening agent until thoroughly integrated.
- Create a well in the center and pour warm liquid and fragrant oil. Gently mix using a circular motion, transforming the ingredients into a rustic, uneven mass.
- Transfer the nascent dough onto a clean work surface and engage in rhythmic kneading. Develop the gluten network through consistent, purposeful movements until the texture becomes silky and responsive.
- Partition the dough into symmetrical spheres, ensuring uniform size and weight. Delicately coat each globe with a thin layer of olive oil.
- Nestle each dough ball into separate containers, sealing with protective coverings. Relocate to the refrigerator’s cool environment for gradual fermentation, allowing flavor complexity to develop over 12-24 hours.
- Prior to culinary preparation, extract the dough from cold storage. Allow the rounds to acclimate and relax at ambient temperature for approximately one hour, encouraging optimal elasticity and volume.
Notes
- Slow fermentation develops deeper, more complex flavors in the pizza dough, enhancing its overall taste and texture.
- Cold proofing helps gluten relax and allows yeast to create subtle tangy notes, mimicking traditional New York pizzeria techniques.
- For gluten-sensitive individuals, substitute half the all-purpose flour with gluten-free alternatives like almond or rice flour while maintaining similar dough structure.
- Experiment with different hydration levels by adjusting water quantity to achieve your desired crust thickness, ranging from crispy thin to slightly chewy New York-style base.
- Prep Time: 10 minutes
- Cook Time: 1 hour
- Category: Lunch, Dinner, Snacks
- Method: Baking
- Cuisine: American
Nutrition
- Serving Size: 2
- Calories: 500
- Sugar: 5g
- Sodium: 800mg
- Fat: 18g
- Saturated Fat: 7g
- Unsaturated Fat: 9g
- Trans Fat: 0g
- Carbohydrates: 60g
- Fiber: 3g
- Protein: 20g
- Cholesterol: 30mg
Dave Mitchell
Founder & Chief Recipe Developer
Expertise
Education
Asheville-Buncombe Technical Community College
Associate of Applied Science in Culinary Arts
Focus: Comprehensive training in culinary techniques, kitchen management, and menu planning, with a special emphasis on grilling and outdoor cooking.
Dave Mitchell is the heart behind Daves Grill, a cook, writer, and lover of all things grilled. He studied Culinary Arts at Asheville-Buncombe Technical Community College and spent years cooking, testing, and sharing recipes that actually work.
Dave started Daves Grill to keep things simple: one great recipe at a time. His food is bold, easy to follow, and made for real people with regular kitchens. From juicy steaks to quick sides, Dave’s recipes bring the heat without the hassle.