
Dreamy Sweet Honey Cake Cheesecake Recipe to Brighten Your Day
Baking a heavenly sweet honey cake cheesecake that melts in your mouth combines the richest traditions of dessert crafting.
Delicate layers of creamy cheese blend perfectly with golden honey notes.
Each slice promises a journey of pure indulgence and warmth.
The recipe weaves together classic baking techniques with surprising depth of flavor.
Soft, luscious textures invite you to savor every crumbly, sweet bite.
Honey adds a natural sweetness that transforms this dessert into an unforgettable experience.
Prepare to fall in love with this decadent masterpiece that celebrates simple, elegant ingredients.
Quick Recipe Overview
Honey Cheesecake Ingredient List
For Cake Base:For Wet Ingredients:For Cheesecake Layer:For Honey Glaze:Equipment That Makes Honey Cakes Shine
Steps to Bake Honey Cheesecake Smoothly
Clear your kitchen counters and gather all necessary baking equipment like springform pan, mixing bowls, and electric mixer.
Blend cream cheese and sugar until silky smooth, then gently incorporate eggs, vanilla, and golden honey. Pour mixture into prepared pan.
Cook cheesecake in preheated oven until center becomes firm. Allow to cool completely, then refrigerate for a couple hours to set.
Whip butter and sugar until fluffy, then fold in honey, eggs, and vanilla. Gradually mix dry ingredients and buttermilk until just combined.
Distribute batter into cake pans and bake until golden and toothpick comes out clean. Let layers cool thoroughly.
Melt butter, honey, and cream together over medium heat until smooth and glossy. Let cool slightly.
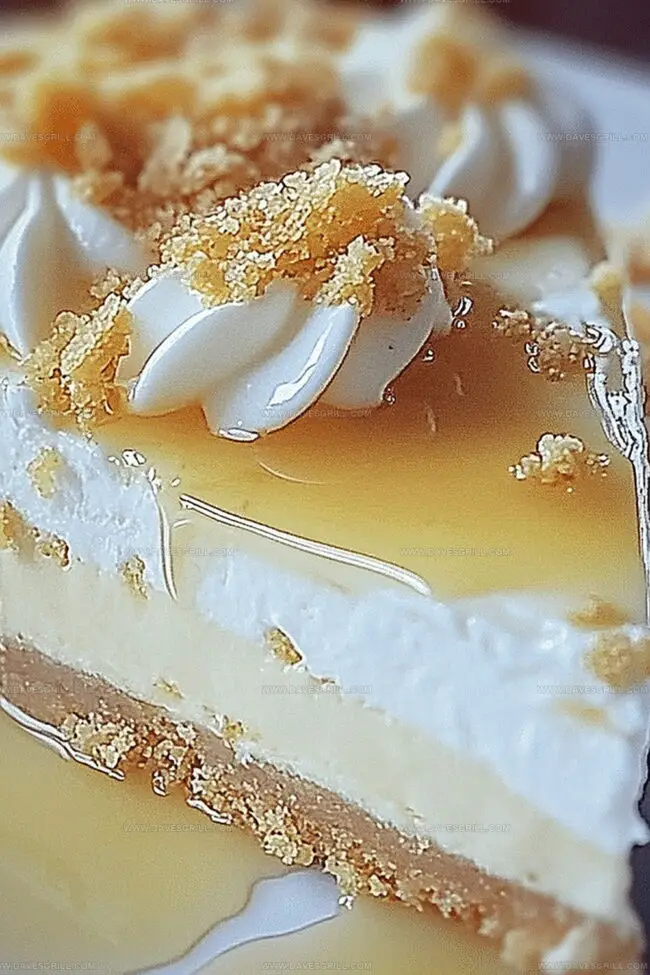
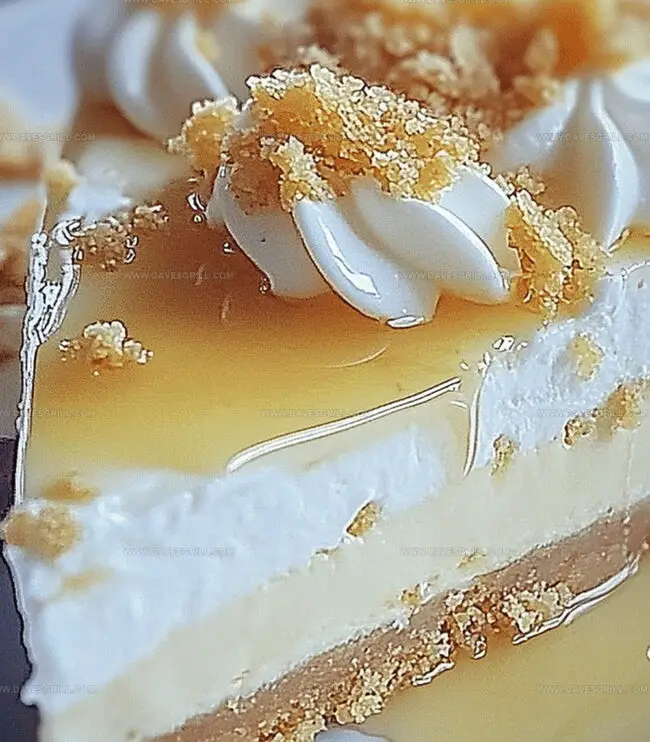
Layer first honey cake, spread glaze, add cheesecake, top with second cake layer. Drizzle remaining glaze over entire dessert.
Refrigerate assembled cake for minimum one hour. Slice and enjoy at cool room temperature or straight from refrigerator.
Tips That Balance Sweet and Tangy
Serve Cheesecake with a Warm Finish
Store Cake Without Sacrificing Texture
FAQs
The honey is incorporated into both the cheesecake batter and the cake layers, creating a rich, sweet undertone that runs throughout the entire dessert.
Yes, you can experiment with various honey types like clover, wildflower, or orange blossom honey. Each will bring a slightly different flavor profile to the cake.
While it requires multiple steps, the recipe is moderately complex. Home bakers with some experience will find it manageable, and the result is an impressive layered dessert.
Chilling is crucial for this recipe. It helps the layers set, allows flavors to meld, and ensures the cake holds its shape when sliced. The recommended chilling times help achieve the best texture and presentation.
Print
Sweet Honey Cake Cheesecake Recipe
- Total Time: 2 hours
- Yield: 13 1x
Description
Delectable honey cake cheesecake melds Polish tradition with creamy indulgence. Layers of sweet nostalgia blend classic flavors, promising a delightful dessert experience you’ll savor until the last crumb.
Ingredients
- 2 cups (250 g) all-purpose flour
- 2 blocks (16 oz / 450 g) cream cheese
- ¾ cup (150 g) granulated sugar
- ½ cup (115 g) unsalted butter
- ½ cup (120 ml) honey
- 2 large eggs (for cake layers)
- 2 large eggs (for cheesecake layer)
- ½ cup (120 ml) buttermilk
- 1 tsp baking powder
- ¼ cup (60 ml) heavy cream
- 1 tsp vanilla extract
- ½ tsp baking soda
- ¼ tsp salt
- ¼ cup (60 ml) honey (for glaze)
- 2 tbsps unsalted butter (for glaze)
Instructions
- Prepare Cheesecake Base: Preheat oven to 325F (160C) and line springform pan with parchment paper, ensuring smooth coverage along bottom and edges.
- Mix Cheesecake Filling: Whip cream cheese and sugar until velvety smooth, gently introducing eggs one at a time, then blend in vanilla extract and honey until uniformly integrated.
- Bake Cheesecake: Pour mixture into prepared pan, baking 35-40 minutes until center sets with a subtle wobble, then cool completely and refrigerate minimum 2 hours for optimal texture.
- Prepare Honey Cake Layers: Heat oven to 350F (175C), grease two round cake pans and line with parchment paper for easy removal.
- Combine Dry Ingredients: Sift flour, baking powder, baking soda, and salt into a mixing bowl, creating a uniform dry mixture.
- Create Cake Batter: Cream butter and sugar until light and fluffy, then thoroughly incorporate honey, eggs, and vanilla extract with consistent blending.
- Finalize Cake Batter: Gradually fold dry ingredients and buttermilk into mixture, alternating to maintain smooth consistency and prevent lumps.
- Bake Cake Layers: Divide batter evenly between prepared pans, baking 25-30 minutes until toothpick emerges clean, then cool completely on wire rack.
- Craft Honey Glaze: Melt butter, honey, and heavy cream over medium heat, stirring until perfectly combined, then remove and allow slight cooling.
- Assemble Dessert: Place first honey cake layer on serving plate, delicately brushing with thin honey glaze layer for enhanced moisture.
- Layer Cheesecake: Carefully position chilled cheesecake atop first cake layer, ensuring stable and centered placement.
- Final Assembly: Position second honey cake layer, generously drizzling remaining glaze over entire dessert for decorative and flavor enhancement.
- Chill and Serve: Refrigerate assembled cake 1 hour to solidify layers, then serve at cool room temperature for optimal flavor and texture.
Notes
Monitor Oven Temperature: Maintain precise 325F (160C) for cheesecake and 350F (175C) for cake layers to prevent overbaking or uneven texture.
Prevent Cheesecake Cracking: Gently incorporate eggs one at a time and avoid overmixing to ensure smooth, crack-free surface during baking.
Room Temperature Ingredients: Bring cream cheese, eggs, and butter to room temperature for smoother blending and consistent texture in both cheesecake and cake layers.
Control Honey Glaze Consistency: Allow glaze to cool slightly before drizzling to achieve perfect drip effect and prevent running off the cake’s sides.
- Prep Time: 30 minutes
- Cook Time: 1 hour 30 minutes
- Category: Desserts
- Method: Baking
- Cuisine: American
Nutrition
- Serving Size: 13
- Calories: 366
- Sugar: 30 g
- Sodium: 210 mg
- Fat: 22 g
- Saturated Fat: 13 g
- Unsaturated Fat: 7 g
- Trans Fat: 0 g
- Carbohydrates: 37 g
- Fiber: 1 g
- Protein: 5 g
- Cholesterol: 90 mg
Emily Lawson
Content Creator & Culinary Specialist
Expertise
Education
Oregon Culinary Institute
Diploma in Culinary Arts
Focus: Emphasis on farm-to-table cooking, sustainable practices, and the fusion of global flavors with traditional grilling methods.
Emily Lawson is the content creator at Daves Grill, turning tasty ideas into clear, easy recipes. Based in Portland, she trained at the Oregon Culinary Institute and loves cooking with fresh, seasonal ingredients, especially grilled veggies and global flavors.
Emily mixes food writing with hands-on cooking to bring you recipes that feel fun, not stressful. Her goal is to make every dish simple, flavorful, and worth coming back to. Together, she and Dave serve up real food, one recipe at a time.